

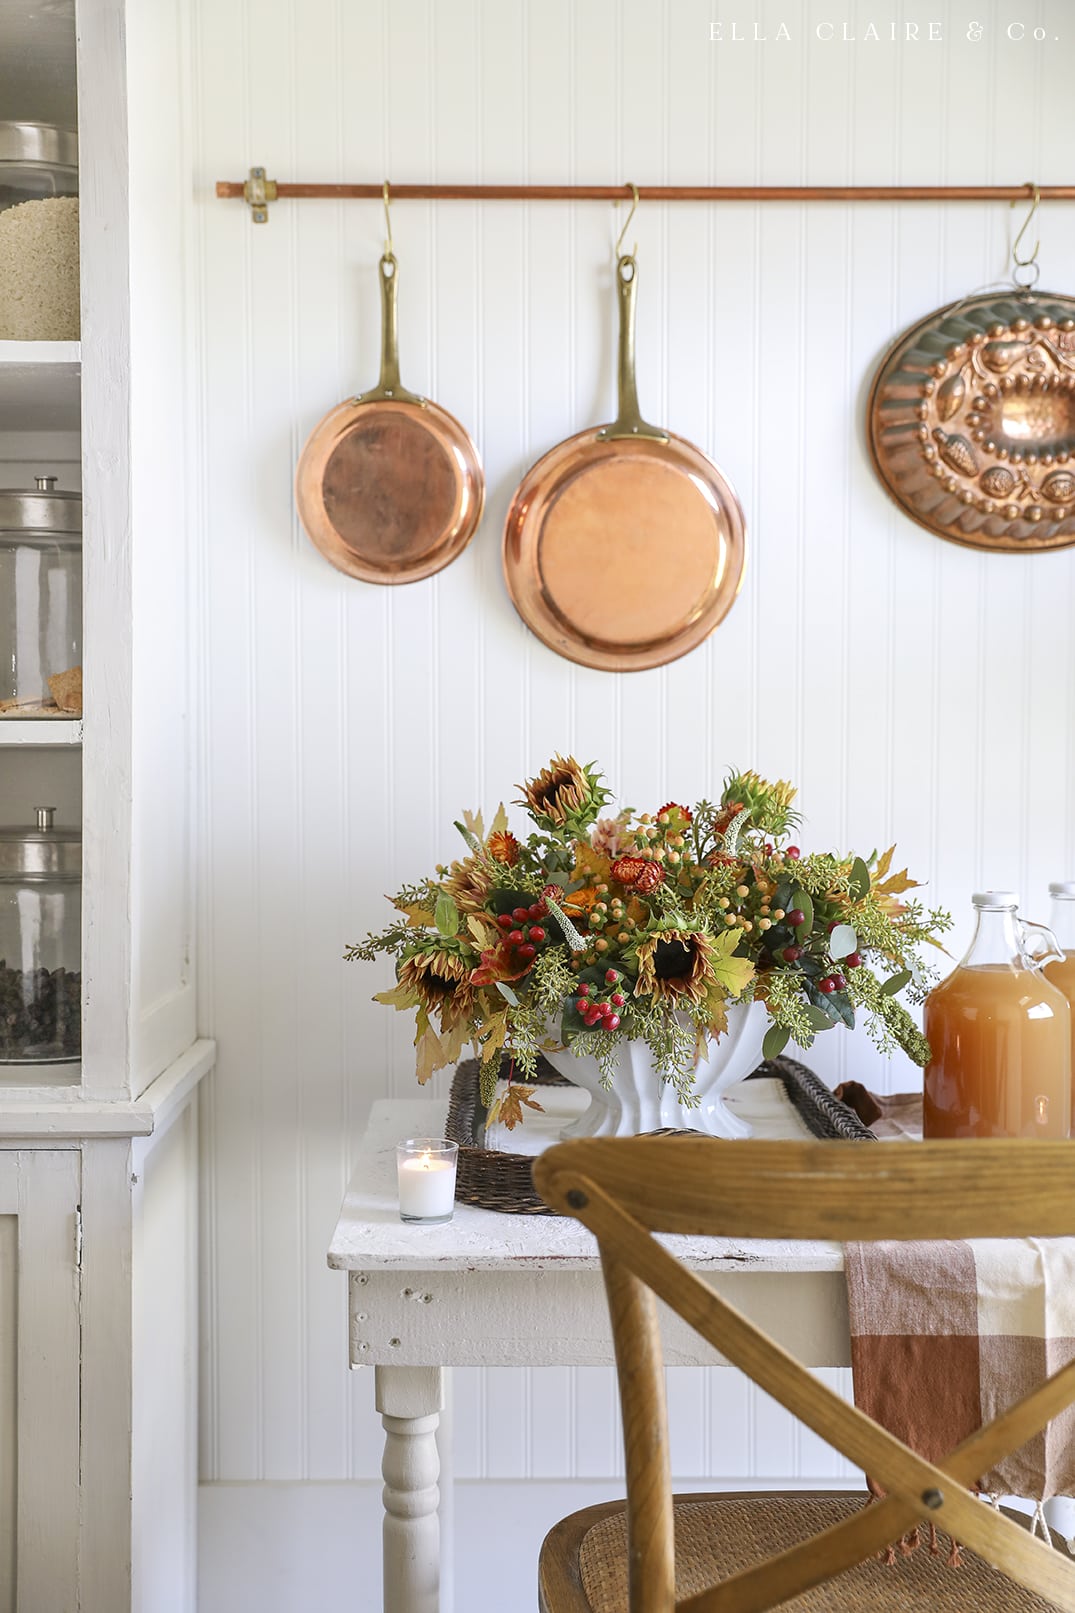
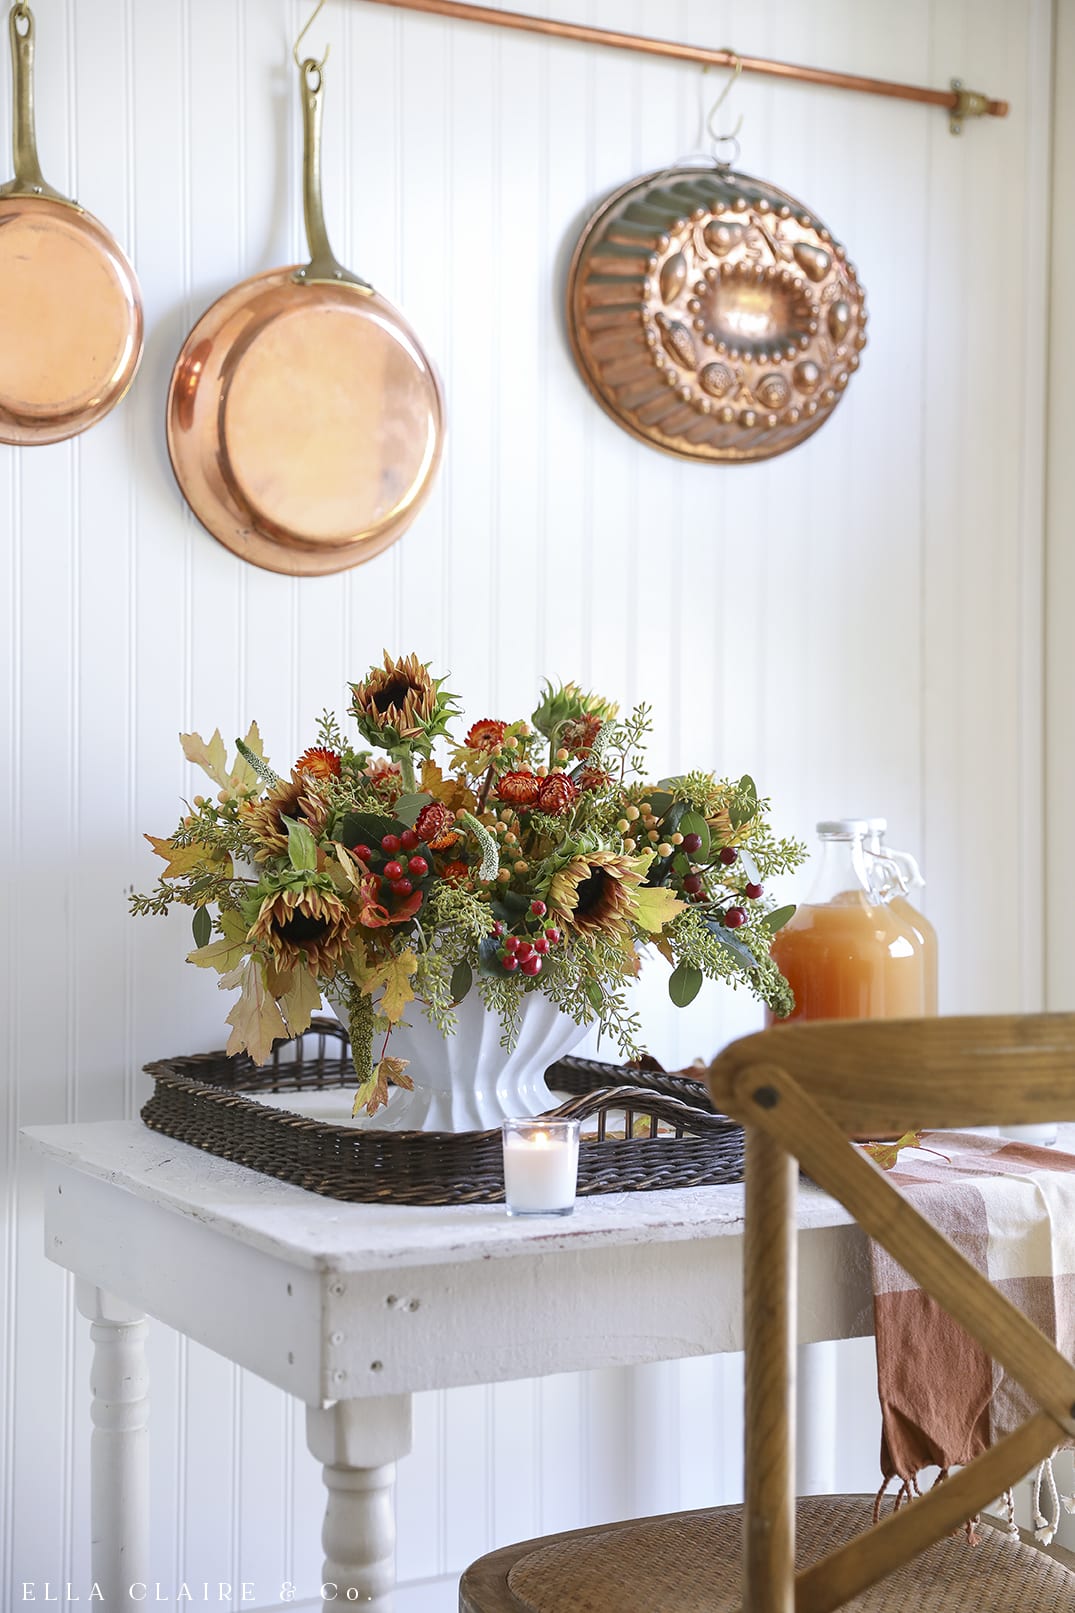
This real copper kitchen rod is so quick and easy to make and comes in under $20! A beautiful choice for a wall rack, I picked up all of my supplies at the hardware store and use it to display all of my copper kitchen accessories!
A DIY project that is functional and beautiful in French country, farmhouse, or old world European kitchens and are perfect for copper pans, towels, and even hanging a picture or Christmas decor!
Even more than my beloved Kitchen Jar Shelves and my Tapered Wood Christmas Tree Box, this might just be my favorite DIY project ever. Maybe even right up there with my She Shed.
I have been wanting to pull out some of my copper (still packed up from our move) and put it out. I have missed my beautiful vintage copper! I didn't want it out on the counter, so this was my solution.
With a lot of empty wall space, it ended up being the perfect solution for filling in some of the bare space as well.
I had it in my mind how I wanted them to look- mimicking the antique copper itself. So I hit the hardware store hoping to find something that would work. After wandering the aisles for a while, close to closing time, a very nice employee helped me to concoct these brackets.
I really love how they turned out! Even better and more sturdy than I thought they would be!
I will share all of my tips and tricks on how to make a DIY copper rod below!
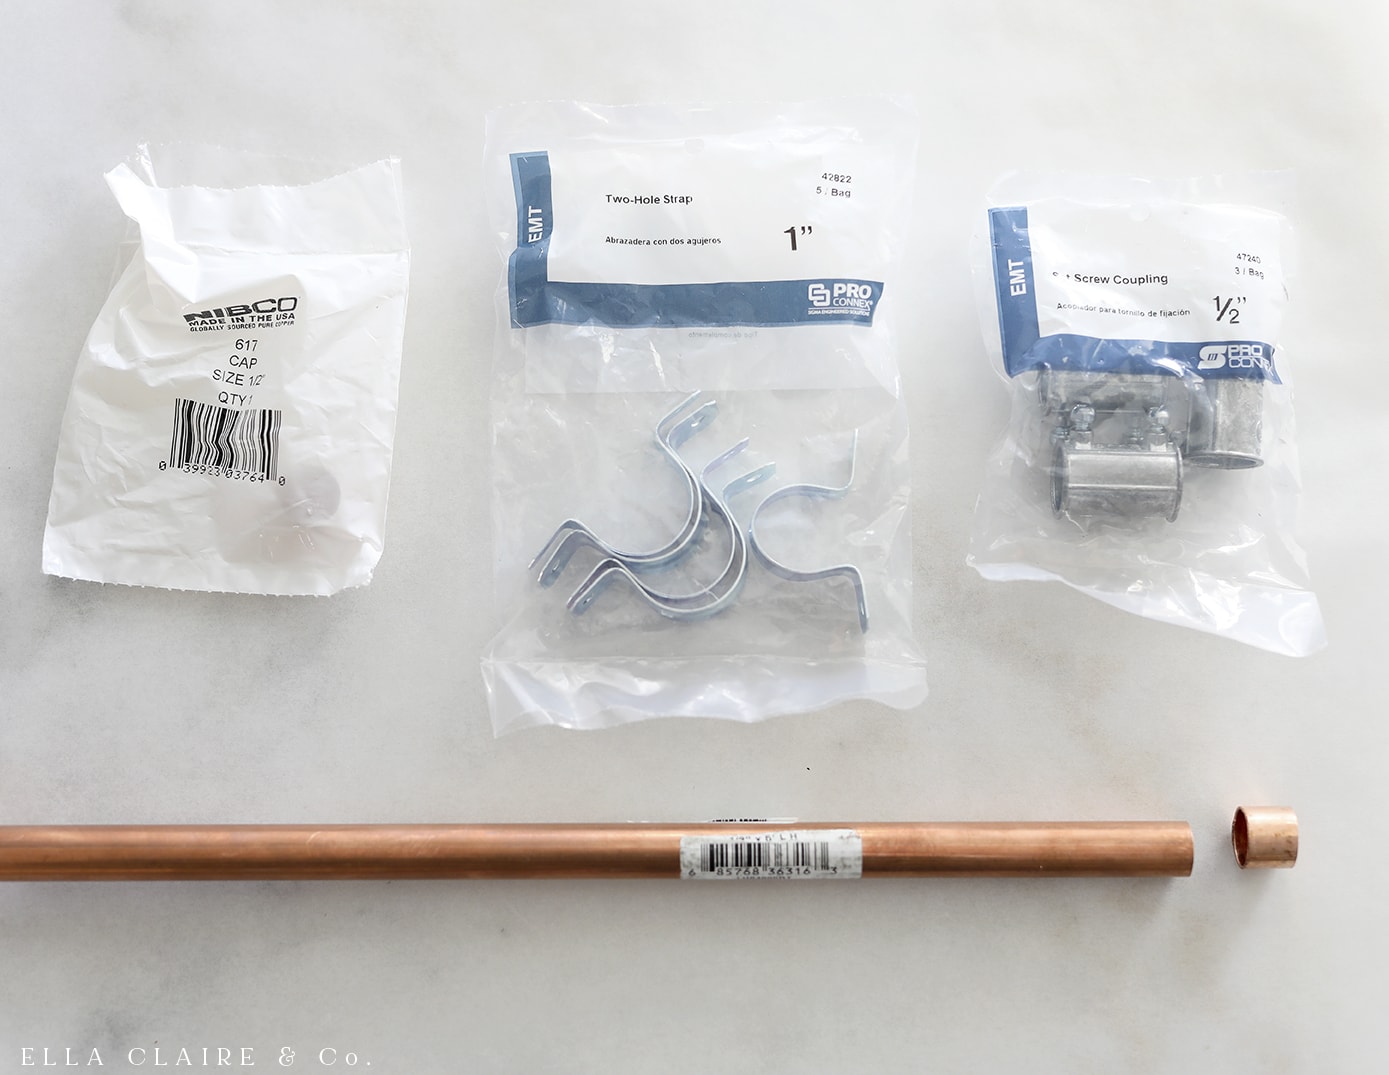
Copper Rod Supplies
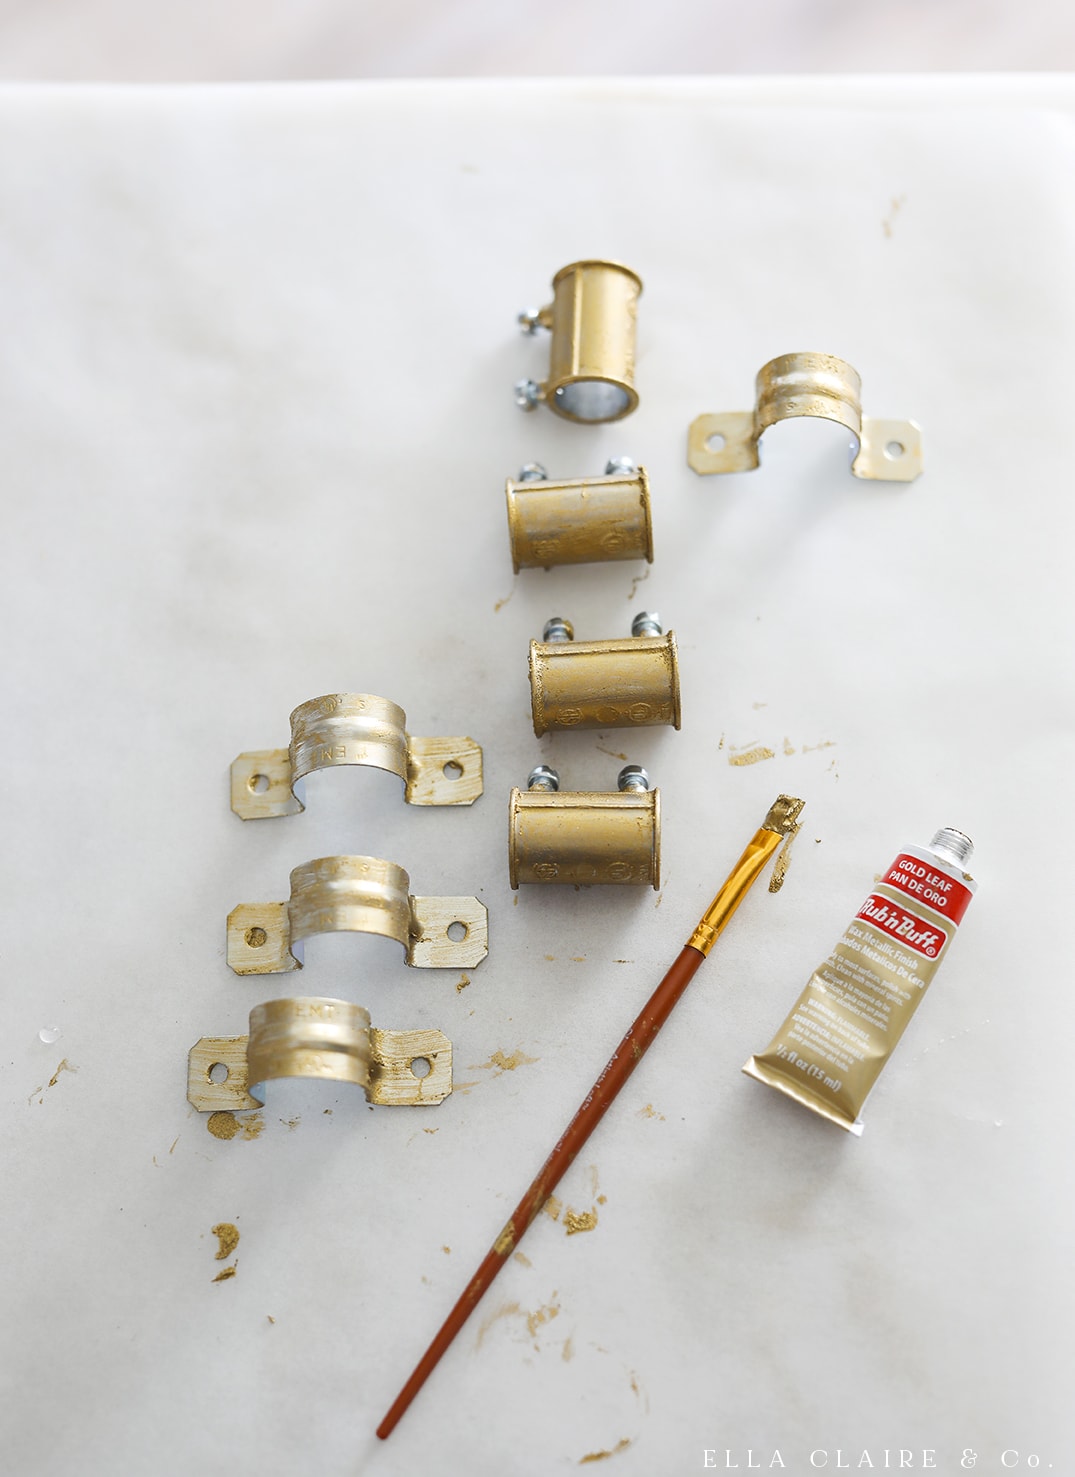
I included a photo below so you will know exactly what to look/ask for. Take note of quantities in each package you buy. Some packages come with more than one in a package.
For one copper rod, you will need the following supplies:
- 1/2" copper pipe, cut to size (see note below)
- 2- 1/2" copper caps
- 2- 1" two-hole straps
- 2- 1/2" set screw coupling
- Rub 'n Buff in the color, Gold Leaf
- brass S hooks
You will also need these tools:
- paint brush
- Drill or impact driver with phillips head
- possibly a copper pipe cutter (see note)
Note: The copper pipes that I bought came in 5 foot lengths. I found them in the plumbing section of Lowes and had them cut it down to the custom size I needed. I don't know if every store will cut them down for you. He used the saw that they normally use for the heavy iron pipes so he wasn't sure it would work, but it actually did work beautifully. If they won't cut it down for you at the store, you can use a pipe cutter (or even a hacksaw) at home. Don't forget to wear proper safety equipment.
How to Make a Copper Rod for the Kitchen
Once you have gathered all of your supplies, the DIY copper rod comes together really easily and quickly!
Step 1: Bend Strap to Fit Coupling
First, insert coupling to a two-hole strap with the coupling screws facing toward where the wall would be. See picture below.
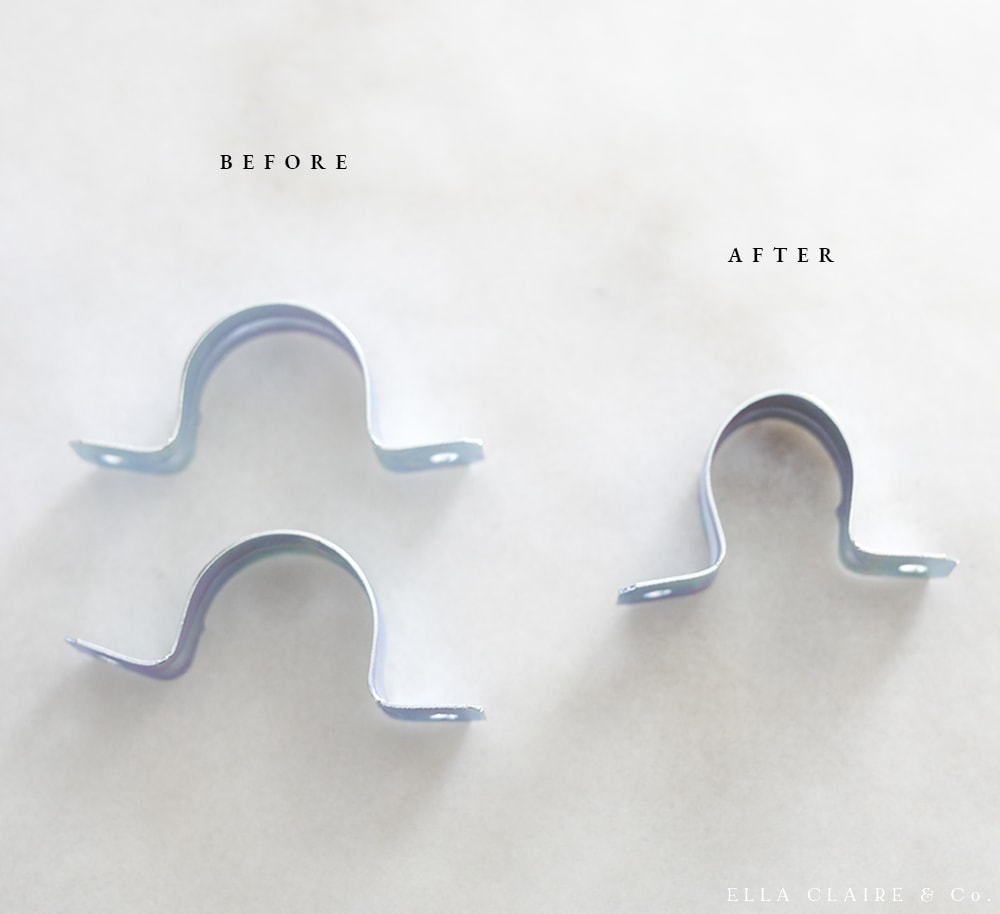
Bend strap around coupling, which will elongate and better form it to the shape of the coupling. I just used my hands to do this.
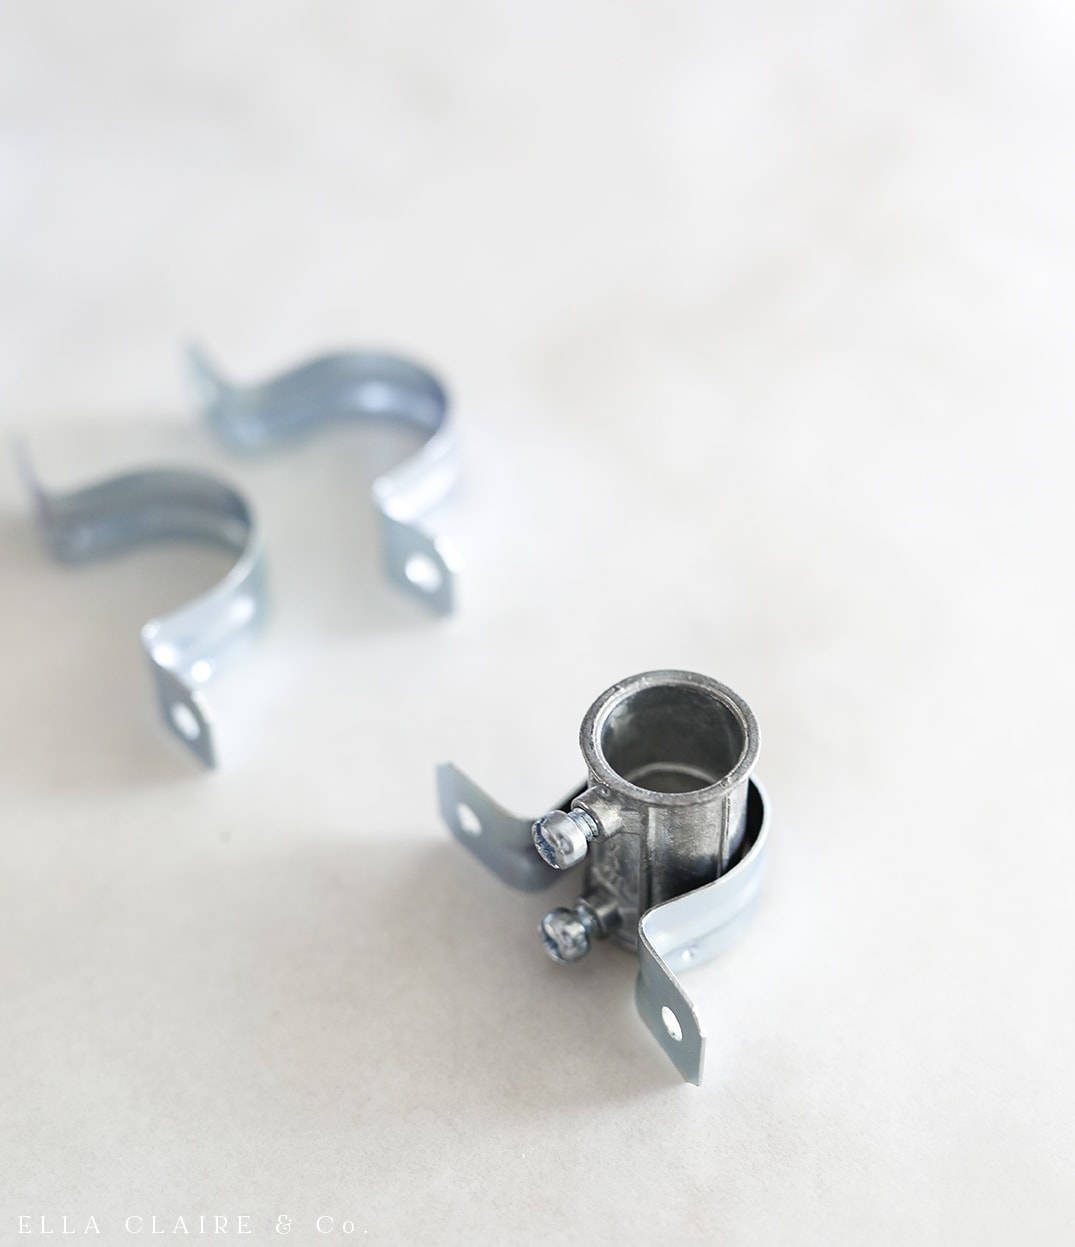
It should go from looking like the strap on the left to looking like the strap on the right. This doesn't have to be perfect as the strap will mold into the right shape even more when screwed into the wall.
Step 2: Paint the Straps and Couplings
Use the Rub 'n Buff in the color, "gold leaf" to paint the couplings and straps.
Follow. the directions on the package. This is one coat below, but mine ended up needing 2-3 coats.
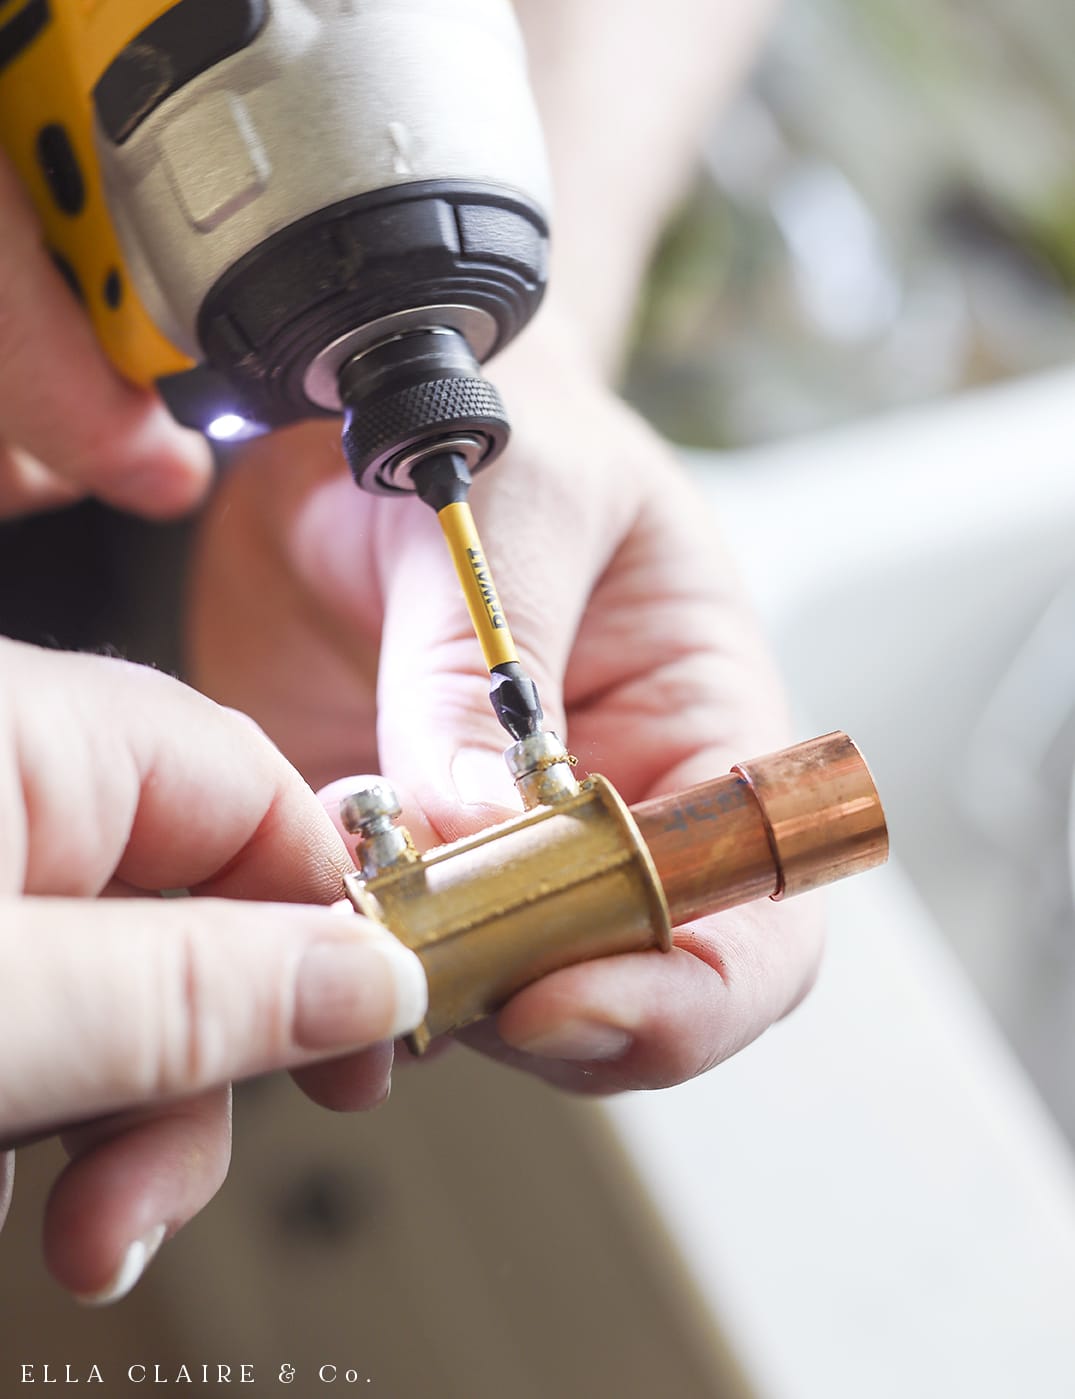
Step 3: Add Cap and Screw Coupling into Copper Rod
On one end of the copper rod, loosely put coupling onto the rod and add the copper end cap.
Hold coupling tightly with the screws facing the part of the rod you would like to face the wall. There was some printing on one side of my rod, so I turned that side toward the screws. I placed mine a finger width from the copper end cap.
Holding very tightly (there were two of us doing this), or holding tightly against a counter, carefully screw the coupling into the copper rod. Make sure that the rod stays straight.
This step is the hardest, but very important. It secures the rod so it won't move around. It also gives the rod a spacing from the wall so you can hang the S hooks.
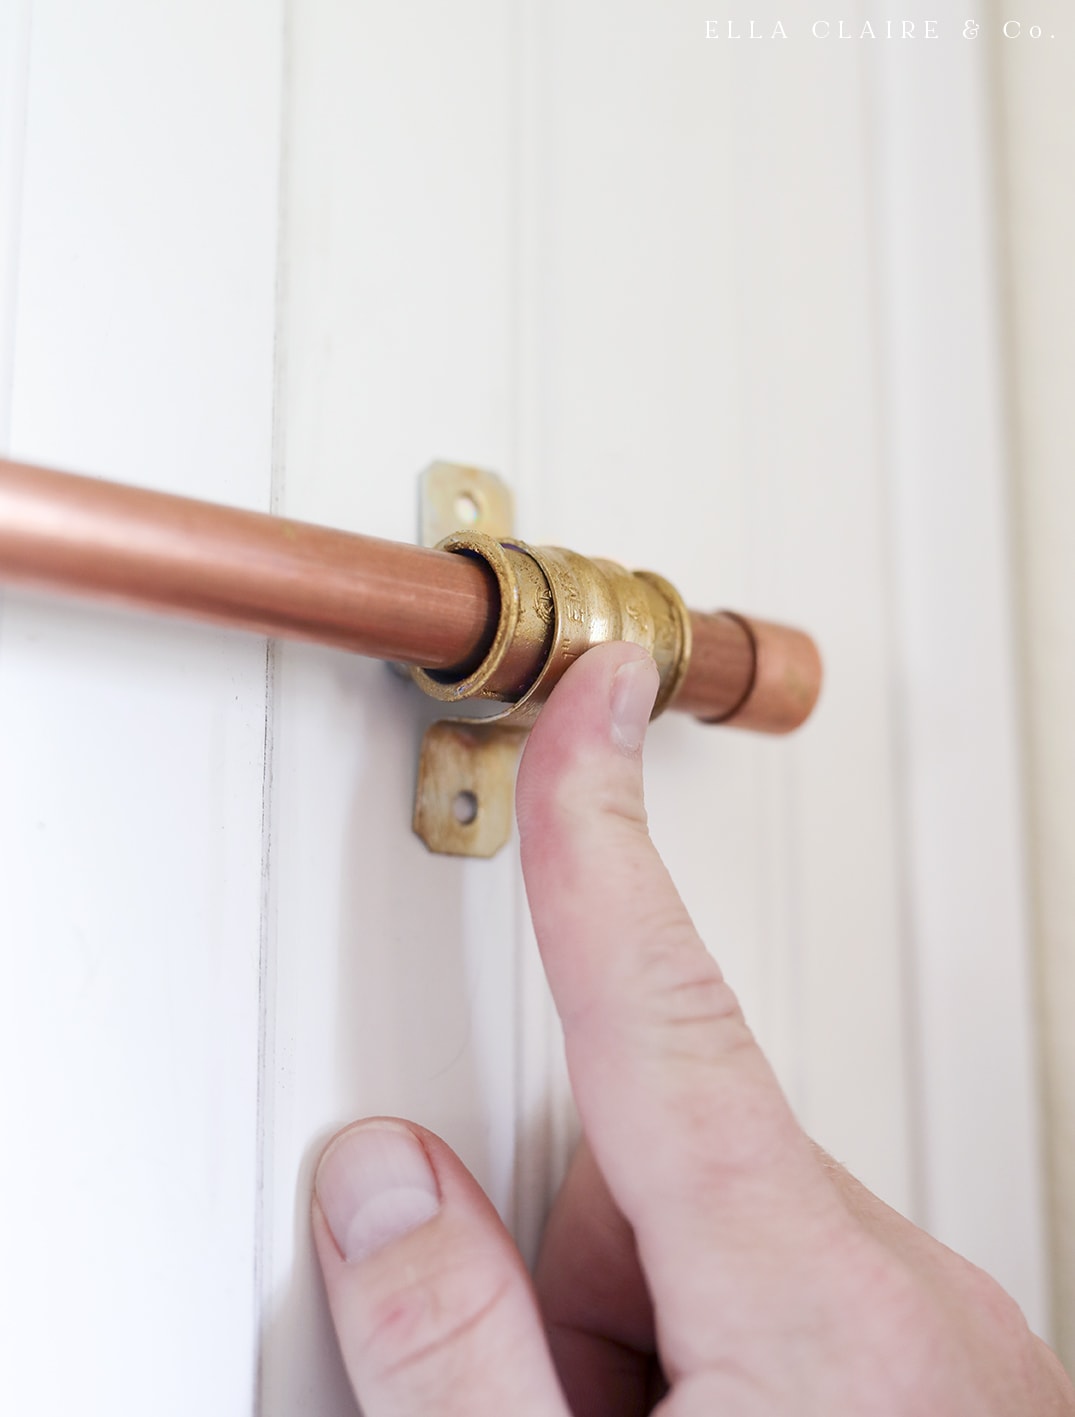
Step 4: Place Strap Over Coupling and Screw into Wall
Place the strap over the coupling and bend more if needed to make it snug. The screws from the coupling should create just enough of a spacer to comfortable hang the S hooks.
Then, just screw it into your wall. We used self-drilling screws so we didn't make any pilot holes. If you are using regular screws, be sure to make a pilot hole.
Note- since this is a faux wall in our rental home, we were able to put a "stud" behind at the height we wanted the rod. If you are hanging into a real wall, use anchors or secure into studs as needed.
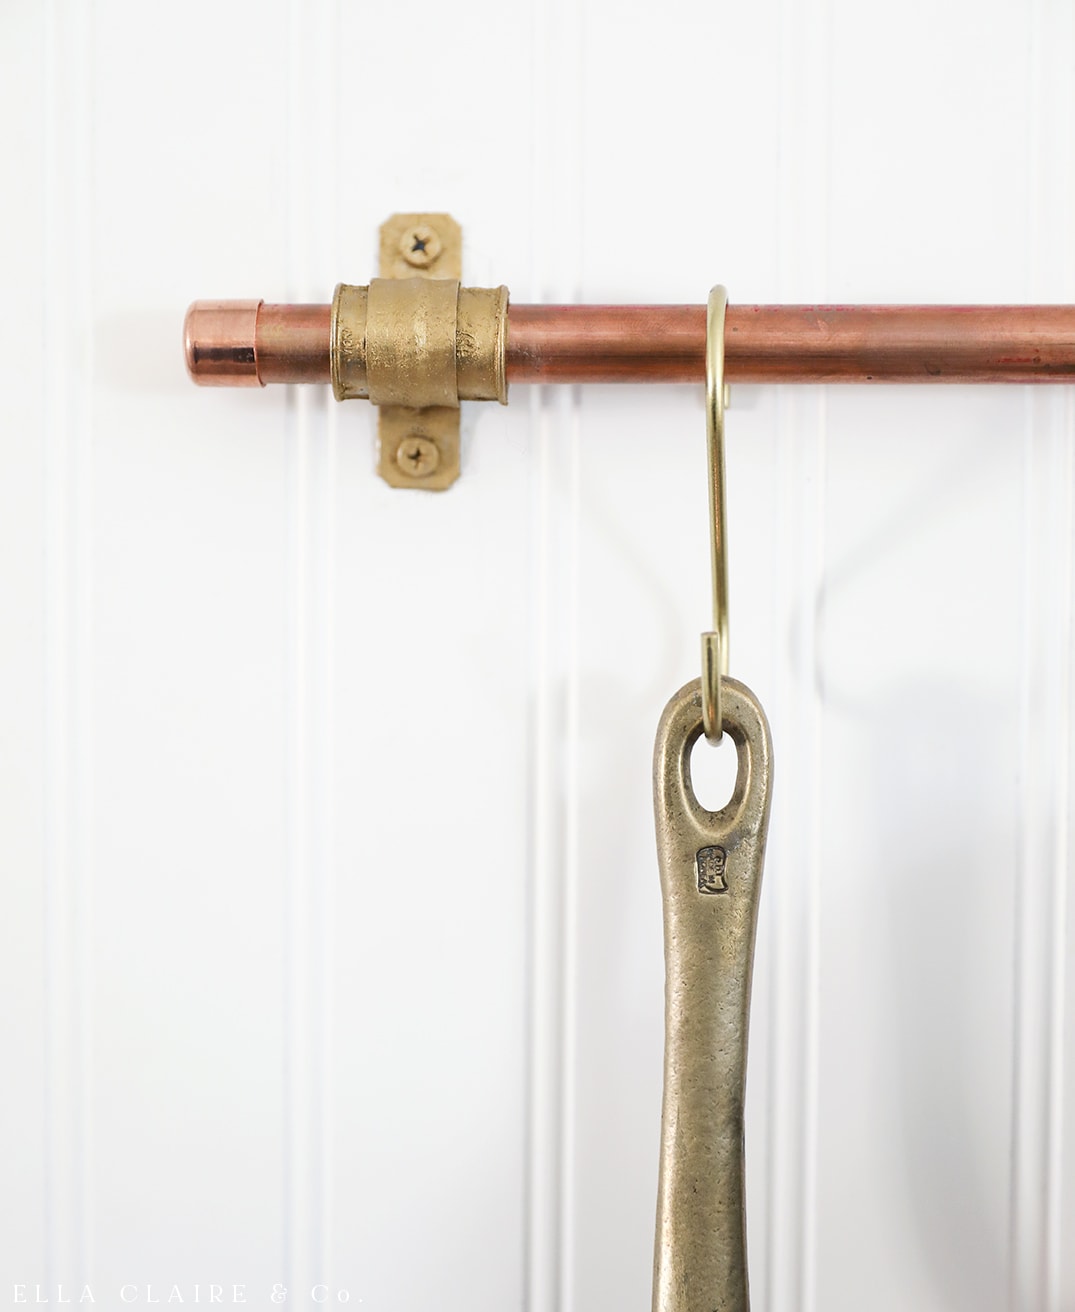
Step 5: Touch up the Brass Paint and Hang Hooks
Finally, just touch up anywhere you need more of the Rub 'n Buff. I covered my screw holes so they wouldn't clash as well.
Add your S hooks and you are ready to hang your favorite copper pans, cute seasonal towels, serving utensils, a small picture or painting, and more.
Note: Copper is a softer metal so these won't be ideal for super heavy things like cast iron.
These copper rods made the biggest difference in our kitchen! I am in love! They will be so fun to change seasonally, too.
Leave a Reply