

An elegant, vintage inspired DIY Christmas ornament with free printable vintage Santas, German glass glitter and bells.
I wanted to add some sweet vintage images somehow to the tree in my bedroom. I found some sweet ornaments last year in a beautiful shade of blue-green and wanted to create something to match. I came up with these sweet little ornaments and have a free printable download for you!
Supplies
- Free printable vintage santas, printed onto cardstock (download HERE)
- Double sided tape (buy here)
- Scalloped cards, Kraft colored (buy here)
- If you would prefer, I also uses THESE scallop scissors sometimes with regular cardstock
- German glass glitter (buy here)
- glitter glue (buy here or here)
- Mini hole punch (buy here)
- bells (I just had some in my stash- you can find them at any craft store)
- twine or ribbon
Step One: Prepare free printable vintage Santas
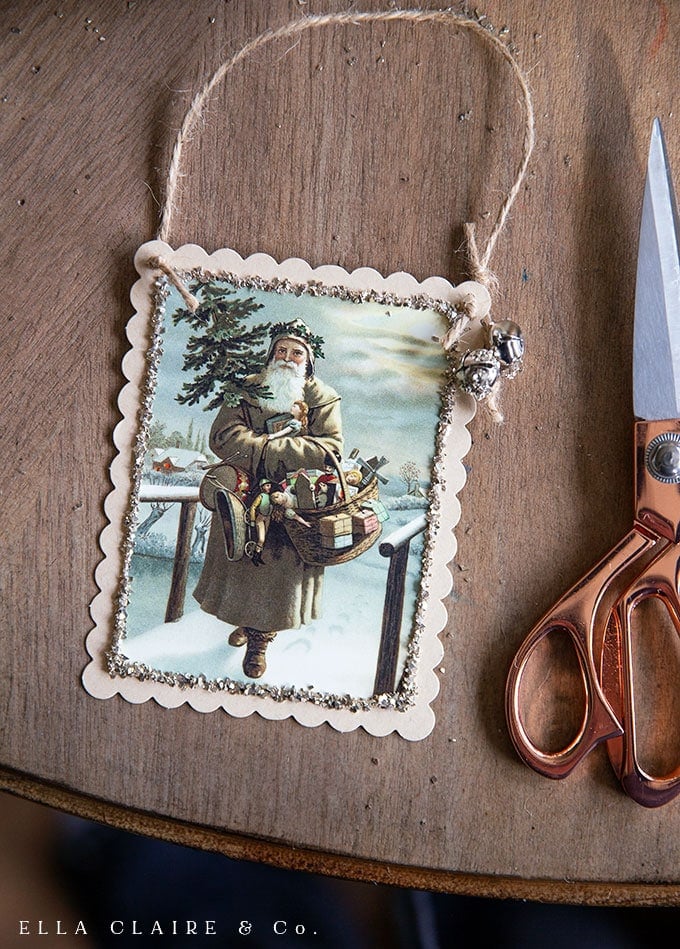
You can Download and Print the vintage Santas from HERE. I used an image from The Graphics Fairy and photoshopped it just a bit. I think it is such a darling little Santa picture, especially with all of the sweet details, little toys, Christmas tree, his outfit- everything! I love it.
Cut out the prints, following the outside rectangular line.

Step Two: Adhere Santa Prints to Ornament Backing
Using double sided tape, attach vintage Santa prints to the center of the cute scalloped cardstock backing. I used the precut Kraft colored scalloped cards, but you could use anything that will match your decor. I use these scissors sometimes to create a scalloped edge, if you would like to use another color of cardstock. Hands down, this premade one was just a lot easier and I loved the color.

Step Three: Outline with Glue
Outline the vintage Santa printable with a bead of glue as pictured below. Keep in mind that the thicker your glue bead, the more glitter you will have on your ornament. I used a medium to small bead of glue on mine.
What is German Glass Glitter?
Before we go any further, I wanted to point out that German glass glitter is different than regular glitter. Regular (cheap) glitter is made of tiny pieces of plastic, painted with the silver color. Glass glitter is actually silver coated glass, crushed up into tiny shards to give the look of glitter. It is so much more rich and sparkly than regular glitter, and since it has actual silver, it can tarnish over time and give a patina that is so rich and beautiful. I have been using it in my projects for nearly a decade and absolutely love the vintagey look and patina it has.
A couple of things to keep in mind: although German glass glitter is more expensive than regular glitter, a little bit goes a very long way. I have used one small bottle over the course of years. Also, just be cautious, glass glitter can cut you if you are not careful as it is made up of tiny shards of glass. It is not a glitter that is good for craft projects with very small children.
What is the Best Glue Adhesive for German Glass Glitter?
Finding an adhesive that will hold glass glitter is important so you don't lose any of your beautiful glitter over the years of use. I have tried several types of glue for German glass glitter over the years, and they are not all created equal. I like these gel and glitter glues (buy here, here or here) for different application uses. I use the inexpensive gel glue if I need to cover a large area or if I need to apply it with a paint brush (like my ornaments here). I slather it on thick when I do use it. I use the other glues if I need more of a controlled line or accent.

Step Four: Add German Glass Glitter
I put my ornament on top of a plain sheet of paper and generously poured my glass glitter on top of the bead of glue. Then I gently turn my ornament on its side and tap off any excess glitter onto the sheet of paper. I use the paper to put the excess glitter back into the container for later use.

Step Five: Ornament Hanger
I used my mini hole punch to add holes to either side of the top of the ornaments and strung twine through, knotting on either end. In hindsight, it probably would have been easier to punch the holes before I added the glitter to the cards. I just used basic twine from my stash, but any ribbon would be beautiful too.

Optional Step Six: Embellish
On some of my ornaments, I hung little bells that I covered with German glass glitter. They were such a sweet little accent. you could also accent with ribbons, bows, more glitter, beads, or other little things.

I love how they turned out. I can't wait to get them up on my the tree in my bedroom! the blue-greens match the other ornaments on my tree so well. Stay tuned!
Debbie Kane
10/28/20 Hi Kristen~The German Glass Glitter you've recommended is not available and doesn't appear that it will be restocked. I've looked around and found one that says 70 grit. Do you happen to know what grit the GGG you have is? I want the silver to add to my ornaments as you've done but not sure what size the glitter is that you have. Thanks for your help. Debbie
Kristen Whitby
Hi Debbie! I updated my amazon storefront and my Christmas sources list with more that are in stock. Both are linked in the shop tab at the top of my page. I am not sure what grit it is, but it is a medium to large grit if that makes sense. I have used others that are a fine grit and this is noticeably more chunky. Hope that helps!
LindaSonia
How can I print a copy of your DIY Vintage Santa ornament instructions?? or can you send me a cooy - email baddabinda at yahoo dot com