

An easy DIY concrete Christmas Tree stand- sturdy, inexpensive, and perfect inside a box or other unique Christmas tree base.
A bunch of you wanted to see how I made my Christmas tree stand up so high (and sturdy!) in the DIY Christmas tree box that I built. Well, here is the answer- An easy DIY concrete stand! It is very heavy and very strong and holds my Christmas tree up nicely. I will walk you through how I made it, and also tell you the lessons I learned and what I will do differently next time.
Supplies
- Sturdy bucket
- 1 1/4" diameter PVC pipe that is snug around your artificial Christmas tree pole
- pipe cap or ziploc bags
- 1 to 1 1/4 bags fast setting concrete mix
- something to mix it with
- water per package instructions
The Bucket
To make this Christmas tree stand, you will need a heavy duty bucket. It has to be the thick and sturdy hardware store kind. In hindsight, I should have probably used a white or dark blue heavy duty bucket since the orange shows in between my slats. I will just wrap a blanket around it, so it isn't a huge deal, but thought I would mention it here in case that will drive you bonkers.

Preparing the Pipe
I used a PVC pipe just slightly larger than the diameter of my Christmas tree pole. They had some precut into 2 ft sections at Home Depot, so I didn't even have to pay for (or haul home) a full length of pipe. I cut about 6 inches off of the end. I attached a couple of ziploc bags with a rubber band on the end of the pipe to keep the cement from coming into the center (it needs to be hollow to hold the tree). In hindsight, I should have purchased a PVC pipe cap to fit over then end and it would have been much easier and would have had a better result. The bags wanted to break as I was pushing them into the concrete, so I couldn't get my pipe as far down as I would have liked.

Mixing the Concrete
I mixed 1/3 of the bag of concrete at a time, following package instructions. You have to work quickly with this fast setting concrete. I used this concrete stirring attachment for our drill that we already had on hand which made it very easy to mix, but you could use a number of things to stir it. I ended up using about 1 1/4 bags, but I think if I had the pipe cap, I could have gotten away with just 1 bag. I ended up mixing the extra 1/4 to add around the pipe because I couln't get the pipe to go down as far as I wanted- and needed it to have a little extra reinforcement.


Setting the Pipe
I used a very large screwdriver to create a little hole while I worked the pipe down into the center of the concrete. Like I said before, I think this step would have been a lot easier and more effective if I had that pipe cap. Use a level to make sure that it is standing up straight in the cement. Allow to dry per package instructions- I believe it was just a few hours before we could put the Christmas tree weight onto it.

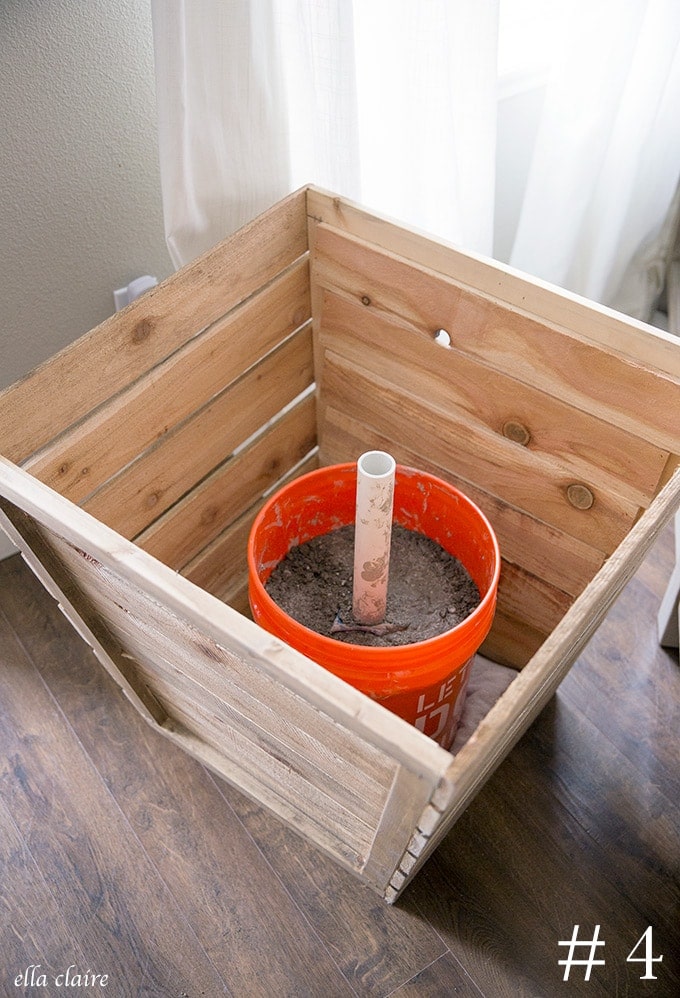
And this is what it looks like in the base of my tree box. It is HEAVY. The box doesn't have a bottom to it, so it sits directly on the floor. I put a towel under the bucket to help it slide when I want to adjust placement of my tree.
Notes
A couple of quick notes- I told you that in hindsight I would have bought the cap and placed the pipe a little deeper in the cement so it would have been reinforced a little bit better. As-is, this holds the tree up beautifully. However, when I started adding all of my heavy ornaments, it did begin to lean ever-so-slightly to the side that was a little top heavy with ornaments (I don't put as many ornaments on the backside since they would be up against the wall). It was still very sturdy (the bucket itself wasn't tipping at all), but I did end up stacking a couple of books in between the pipe and the bucket wall to help reinforce the pipe on the heavy side of the tree. Worked like a charm. The next time I build one, I will just avoid this by buying the pipe cap and setting it a little deeper.
You can see the instructions for my DIY tapered Christmas tree box HERE.


Leave a Reply