

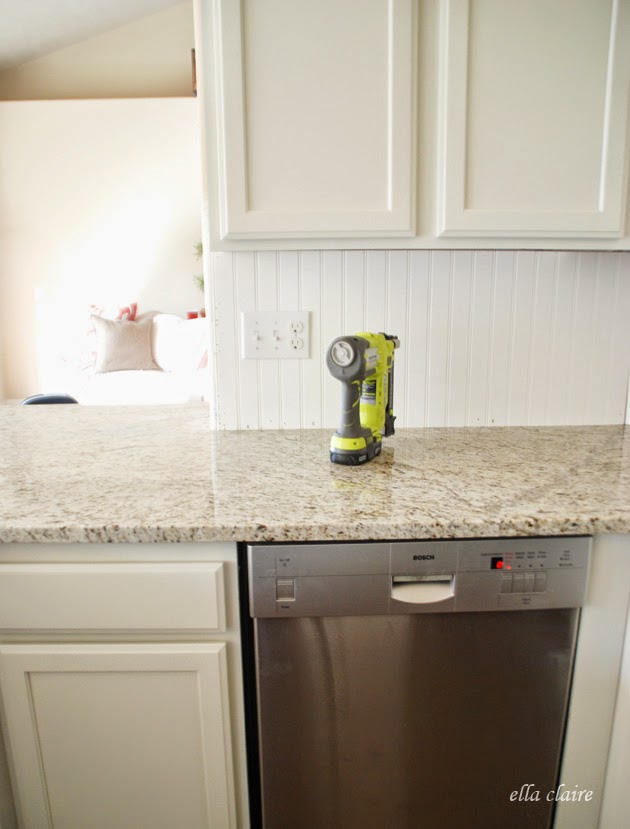
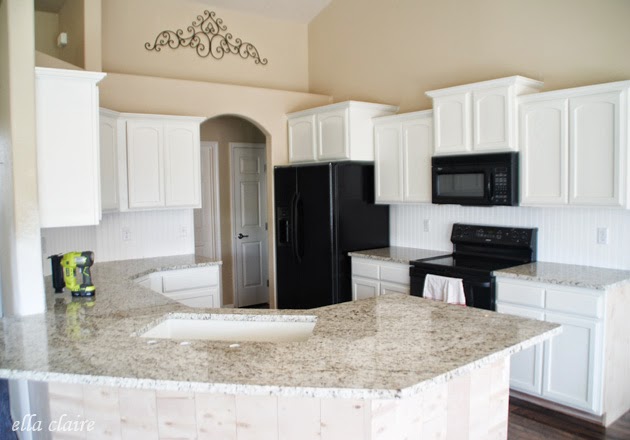
After we had the tile ripped out in our kitchen, we decided to replace the granite with this gorgeous slab. I will be sharing a little more about that this week. We were debating between a couple of different options for backsplashes, but ultimately decided on beadboard. I love that is has such a warm and classic feel, and it only took a few hours to install.
I took a lot of pictures, so hopefully this will help answer your questions if you are looking to install a beadboard backsplash. It is so affordable and makes such a huge difference that I highly recommend it!
First, I headed to The Home Depot to grab my beadboard. I had them cut it to size for me, so I went already knowing my measurements. I recommend this step, especially if you don't have a table saw. It saves A LOT of time to have them take care of it for you. I only needed one $20 sheet of beadboard for the whole kitchen. I wish I could say that I had my act together and got all of the supplies that I needed in just this one trip, but I would definitely by lying. I also had to go back for the trim. And then back again because I miscalculated how much trim I needed the first time. oops.
I had the rest of the supplies on hand, and if you also have these on hand, you can keep your cost down to right around the $30 mark as well. It is definitely a worthwhile investment to grow your stash as the majority of these things can be used for so many other projects.
Supplies
:: Beadboard, cut to size
:: Trim
:: RYOBI Airstrike Cordless Brad Nailer
:: Brad nails
:: Liquid Nails
:: Caulking gun
:: Spackle
:: Spackle tool
:: Sanding block
:: RYOBI JobPlus with the rounded attachment head (included)
:: Drill with bits
:: Safety equipment
:: Tape, pencil, level
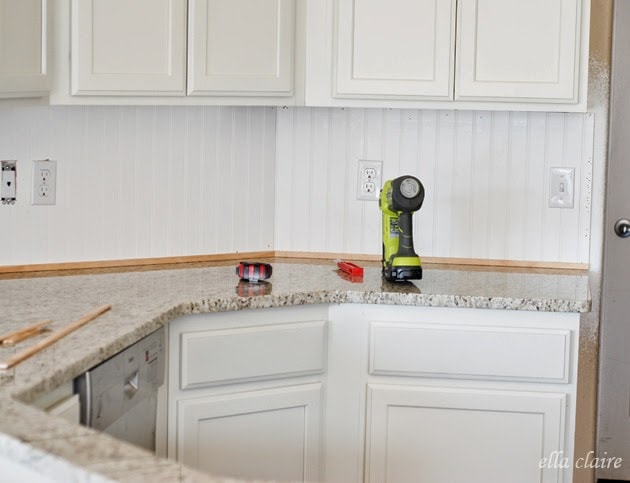
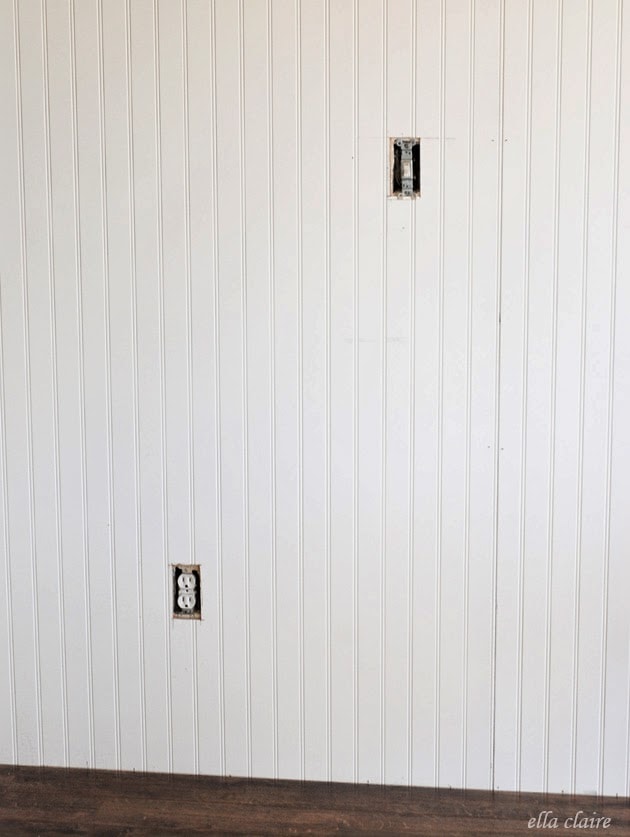
If you have Home Depot cut your beadboard to size, then the next step is to cut out the holes for your outlets. You can measure and mark the traditional way, which is a little time consuming or you can use this genius trick that the hubbs came up with {don't tell him I said he was a genius (: }.
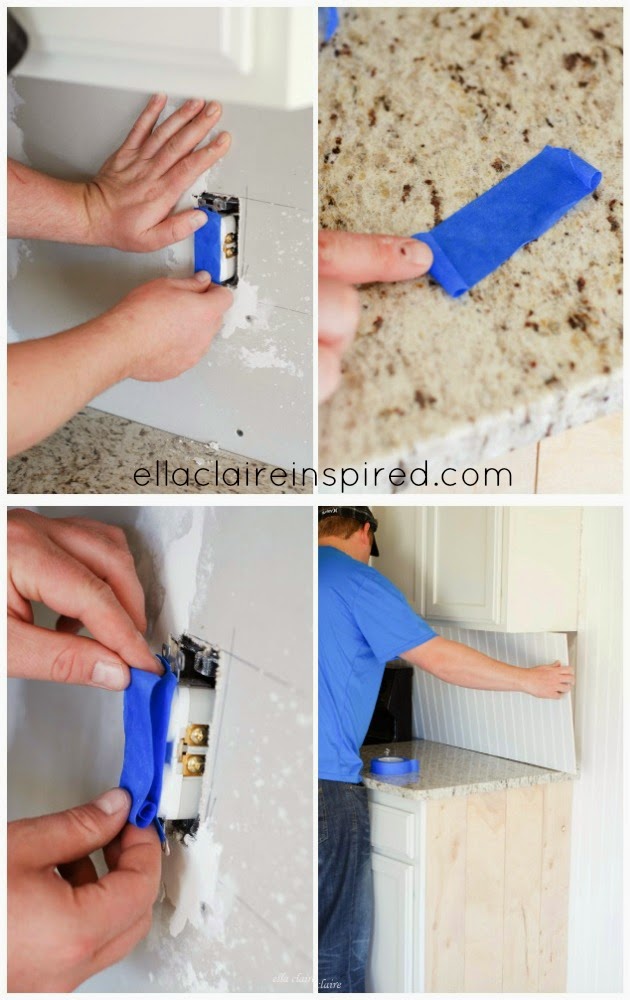
First, you need to use a blue painter's tape. It doesn't stick to itself as badly as other types of tape, so it is perfect for this project. Place a strip over your outlet. Lay out another piece of tape with the sticky side down and roll the ends back toward you like the picture below. Rolled ends included, this should be the length of the outlet.
Place rolled tape on the outlet with rolls down and sticky side out. Place your beadboard where it will be installed, and press firmly against the tape, then pull back toward you.
The tape will attach to the beadboard in the exact spot it needs to be cut.
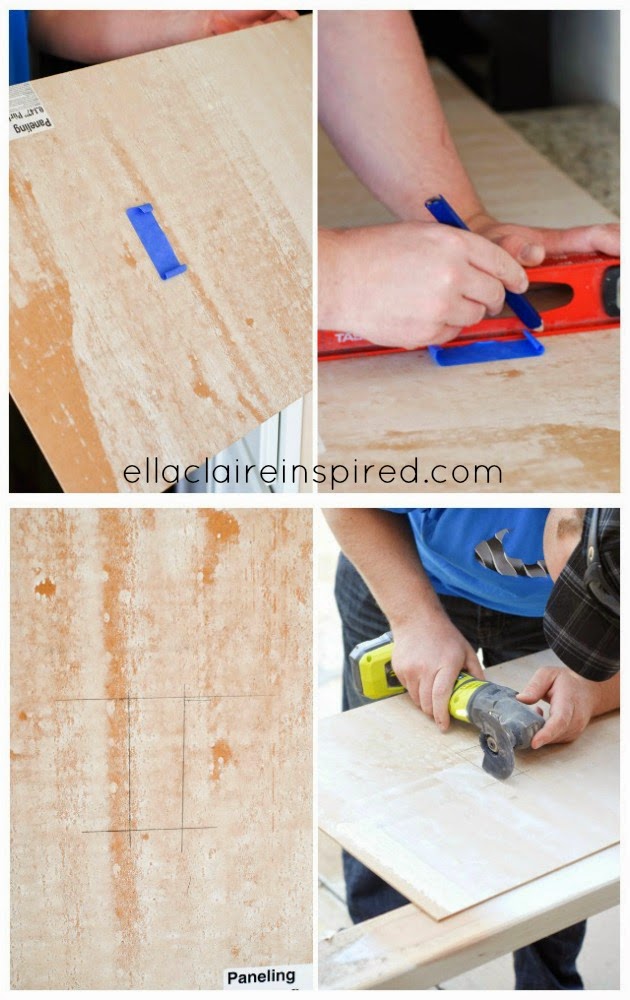
Use a level and a pencil to mark the outsides of your tape and then double check the measurements. This little trick took SO much less time than the ones we marked originally with just measuring.
Then, just cut along your pencil marks, flip over and pop out the center.

I recommend double checking your cut before the next step by putting it up against the outlet to double check that it is in the right place.
Next, squirt liquid nails all over the back of your beadboard. This will make your backsplash adhere a lot more evenly.

Lean your board up close to the wall without actually touching it, or the outlet.

Hire a licensed electrician to install the electrical.
Secure the beadboard along the edges, and periodically throughout. We used the RYOBI Airstrike Cordless Brad Nailer and I have to say that I am completely blown away {no pun intended} by how strong this baby is without an air compressor!
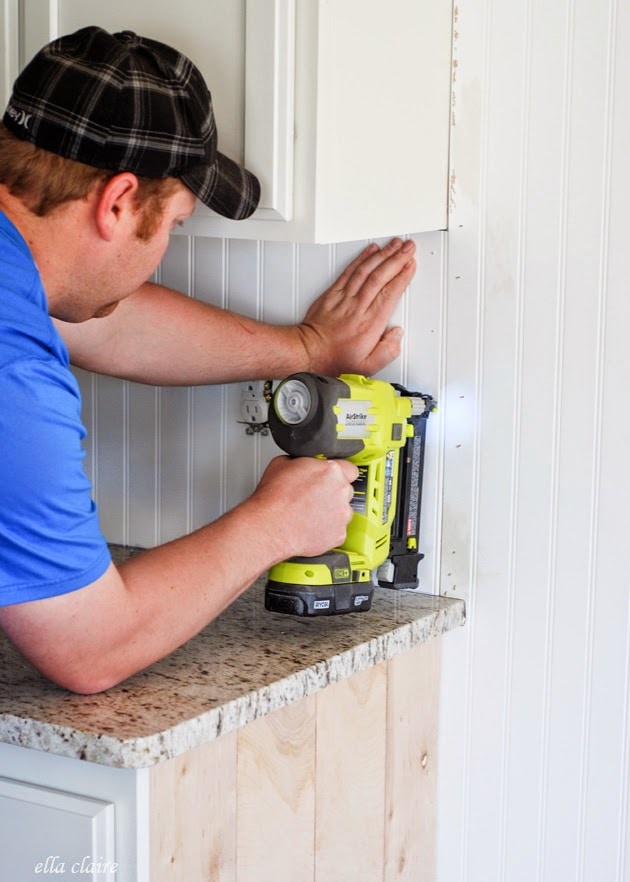
Repeat throughout the entire kitchen until completed.
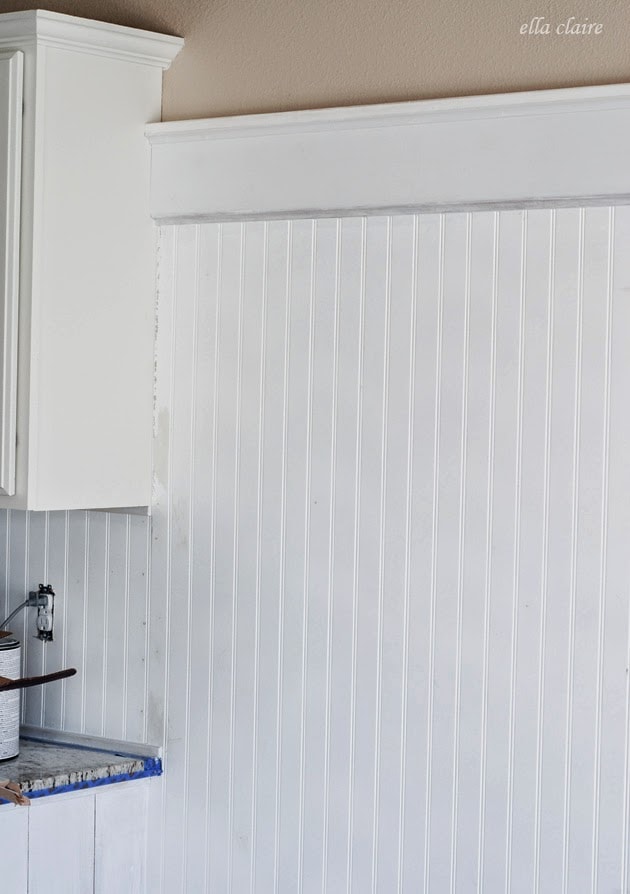
Add trim to your edges if you choose. Just cut to fit and nail in place.
We chose to extend the beadboard all along the wall as well. I love the way it looks up against the planked sides of the cabinets (tutorial here).
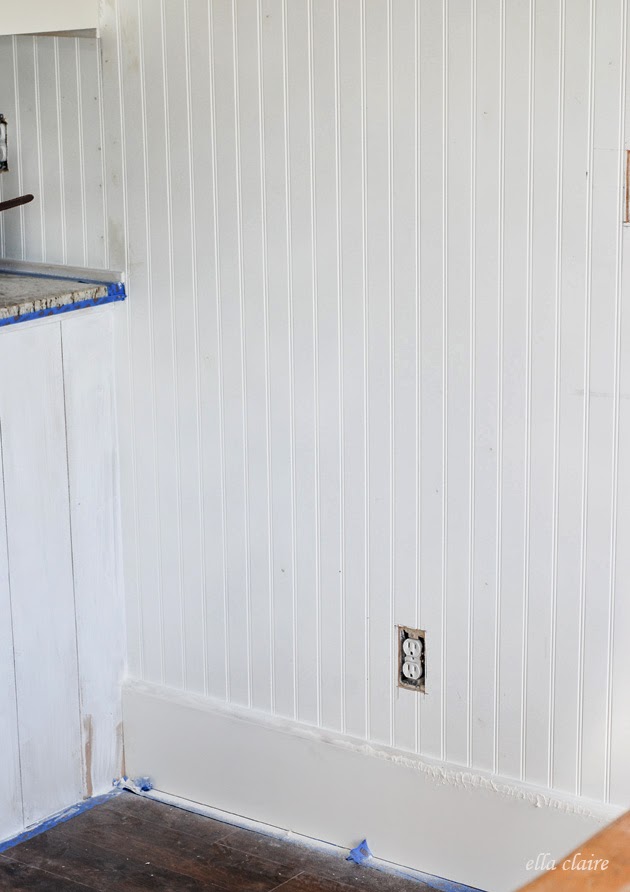
Then the more tedious work begins. Spackle, caulk, sand, repeat. I like to use the spackle that starts out pink and then turns white when it dries. I also like to use these little foam sanding blocks in 120 grit. They seem to be a lot gentler to the wood.
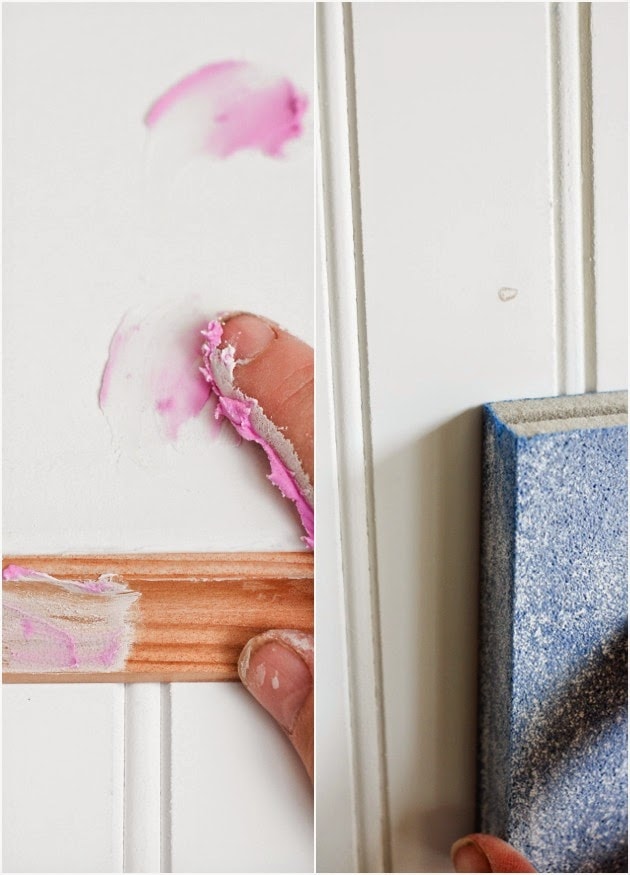
Now, caulking beadboard is something I thought was going to make me absolutely crazy. It was SO hard to get the lines smooth on top of the grooves. I played around a little bit with a few things and I figured out a MUCH easier way. And, it looks PERFECT when you are done. No matter how hard I tried, I couldn't get it right until I did it this way.
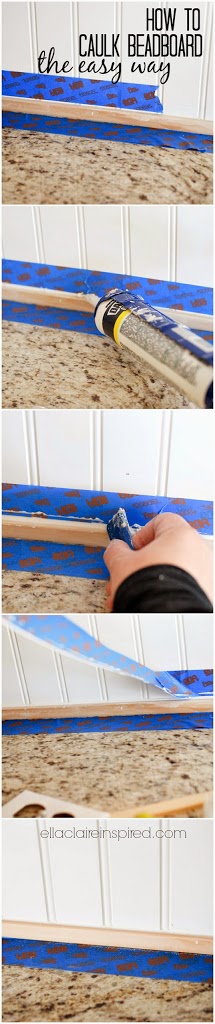
1. Tape it off, leaving a small space the will be the width of your caulk.
2. Caulk
3. Smooth bead of caulk with the rounded caulking tool (or your finger works too... but I have to admit, I love the tool)
4. Remove tape directly after smoothing while caulk is still wet
5. Admire your perfect caulk line
~~~~~~~~
Spackle, caulk, sand, repeat until all of the surfaces are smooth. Then it is all ready to be primed and painted.
~~~~~~~~
I will be sharing the full kitchen reveal next week with the fully painted wood so I hope you will come back to check it out!
For now here is a sneak peek of just a couple of the primed areas to give you a little glimpse. I still have a bit of sanding and touch up left in these pictures before painting. I think you will love the transformation. You will hardly believe the difference between the before and after pictures.
Happy Mother's Day to all of the lovely mamas out there. To ones who have babies, the ones who have lost babies, the ones who long for babies, and to the ones who live a life sharing the love of a mama's nurturing heart.
Julia Rutili
I am DIY-ing my very small farmhouse kitchen and want to use beadboard on the walls. My ceilings are 96" - how high up on the wall does the beadboard go? I have open-shelving (no wall cabinets). Thank you for your lovely ideas and inspiration! Julia
Kristen Whitby
The sheets I buy are 4 ft. by 8 ft. so you can have them cut down to whatever height you prefer. Our wall has beadboard up to 6 ft. 7" including trimwork.
Sue
Love this look. How does it stay waterproof behind the sink? We get lots of splash up when doing dishes ectera.
Kristen Whitby
We don't have beadboard behind our sink since our sink is on the peninsula.
Sandi Snyder
What finish of paint did you use?
Kristen Whitby
I used a satin but Semi gloss would be best for cleaning purposes.
Devise
Do you have issues with cleaning the backsplash behind the stove? I was worried about grease popping up there.
Kristen Whitby
Nope! I just use hot water and dish soap.
Mark Geiger
I love it. I was looking for a back splash idea. I only thought tile. Thank you for opening my eyes to a new concept. And the little tape tip is ingenious and so simple. I cant wait to get started.
Cene
Yes !!! Your husband is definitely a genius ! That tape trick is THE best !
Heather Taylor
I’m doing this now and I’ve been struggling with the outlets. I agree genius
Grace Smith
Beautiful look and well done..Bravo!!
What is the tool used to cut out electrical hole in headboard and where can I purchase it?
Terry
The backsplash looks really great! I love the warm white color on your kitchen cabinets. Could you please tell me the paint color and brand you used?
Kristen Whitby
Thank you so much Terry! It is Nacre by Sherwin Williams
Matthew
Beadboard Wainscoting is a kind of wood paneling used for centuries as both decorative accents, insulation and to prevent (and cover up) water damage on walls. Originally riven oak boards would cover the entire wall, but in the 1700s panelling began to cover only the lower part of the wall.
Noddynani
I love this look, and thanks for the extra tips...very useful! I wonder if all Home Depots cut to order? I have only seen customers using the saw set up in my local store. If I could get the beadboard cut to size I would attempt this myself. Yours turned out beautifully. 🙂
Danielle
The beadboard backsplash looks a-maz-ing! x
Zimtkätzchen und Zuckerschnecke
Oh Kristen! It is so beautyful!! I love your kitchen! I want some beadbord to but only in the bathroom and in the floor. Because our heater is IN the wall and so I can not work with nails (or it´s getting wet 😉
Can you buy beadbord in America? We have to buildt it Piece by Piece...
have a nice day!!
many greetings Dani (yesterday I started with your beautiful "Cut your own Christmas Tree" sign. Christmas Comes fast... 😀
Jeanette@Creating A Life
Such a wonderful look! Thanks for the great tutorial.
Jeanette
Kristine Brittany
Gorgeous! I love how you extended it along the wall too. 🙂
20 North Ora
Happy Mother's Day to you sweet girl! Love the tutorial. He makes it look easy. LOL
Judy