

Create the most full and beautiful Christmas Garland with a few simple steps and have a gorgeous mantel all season long! This unique technique mixes faux garlands with real stems of greenery to create a very life-like and gorgeous garland!
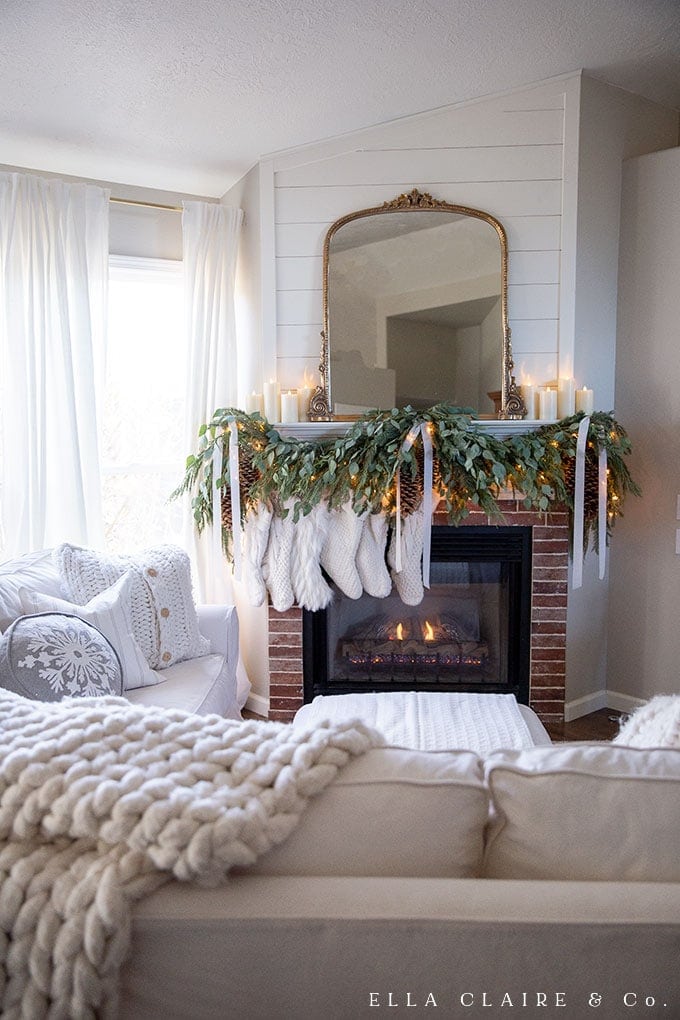
I love really lush and full looking garlands, but the price tag on those can be kind of steep. I have a little technique for creating the look at home for much less, and it mixes a faux garland with fresh greenery for a perfect Christmas mantel. I used the same technique in the above photos, but just changed up the different types of greenery used. The top one is using more cedar branches, and the bottom has more eucalyptus. You could very easily customize it for the look you are wanting to achieve for your home.
Supplies
- 2 matching 6 foot garlands (mine are sold out, but this garland is very similar. This one is gorgeous as well)
- floral wire
- command hooks (I use these for the garland and these for my stockings)
- lights (if your garland isn't already prelit)
- greenery (I used branches of cedar and the feathery kind of eucalyptus- my grocery store ordered them for me)
Step One: Fluff the Garlands
Before using any faux greenery, garlands, or Christmas trees, it is important to fluff them- make the branches look nice and separated and pretty. This is a particularly important step because we will be adding other greenery and we will need these branches to be nice and evenly spaced.
Step Two: Hang the First Garland
The first garland will be hung on approximately 2/3 of the mantel, with enough to hang down on both ends. If you don't have enough (if your mantel is larger than mine), then you might need to have longer garlands or modify these instructions to use 3 garlands on your mantel.

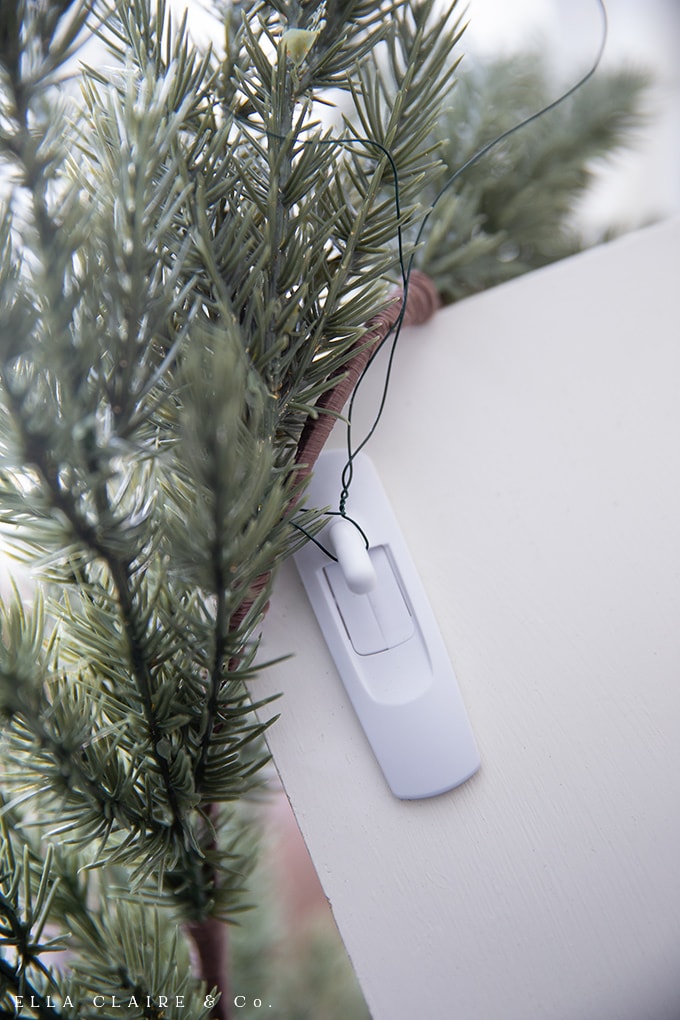
How to hang garland without damaging the mantel
When I hang my garland, I always use removable command strips (I use these for the garland and these for my stockings). This is an overhead shot of my mantel, looking down onto the garland. I usually drape the garland slightly up and over the mantel, then use floral wire to affix it to the command hook. The nice thing is that when the season is over and the garland comes down, it won't leave any damage to the wood.
Step 3: Change direction of the needles
There is a small part of the garland that hangs down in the middle of the fireplace and the needles will need to be facing the opposite direction. Just bend the needles down like pictured below. You will see why we want to do this toward the end of the tutorial. I also take this time to fold up any thick wire garland ends so they are hidden underneath the needles.

Step 4: Repeat with the 2nd garland
Repeat the above steps with the 2nd garland on the opposite side so that it overlaps the first garland and 2/3 of the mantel as well. Be sure to fluff the 2nd garland, and then bend the small tail of needles in the opposite direction.
It would be really beautiful to stop right here. Just add some stockings, maybe some candles on the mantel, and call it good.... but I love adding the little bit extra, so I will show you how I make my garlands really lush and full.

Step 5: Add Lights
I just had to add twinkle lights to my garland (I used these). At Christmastime, I just love adding them everywhere I can squeeze them in. I think they are so magical and my littles love them. We have a plug right under the curtains, so I just plug them in so the plug is out of sight.

Step 6: Add Live Greenery
This is my very favorite part! I add stems of live greenery to my faux garland to really give it that fresh beautiful look. With this little trick of mine, something magical happens- adding the live stems tricks your mind into thinking the faux part is real too. I have had many people think that the whole thing is a beautiful live garland before.
Why not just use a real garland?
I know some of you are thinking- Why not just use a live garland and be done with it? Well, a few reasons.
First, I like the faux base with greens on top because the faux garland gives it a lot of structure and makes it look good all the way up until Christmas.
Second, I like the way the faux garland underneath is something I can pull out each year and it keeps relatively the same, so it is already the size and shape I need. With a little fluffing, it is just ready to go. Super easy.
Third, I keep up my garlands for a very long time (November 1st- January 1st) and full real ones tend to dry out, and get very crumbly, really quickly in my home.
Lastly, a full and lush live garland like this is very expensive. It can cost a few to several hundred dollars. I invest in my base faux garlands and then spend a small amount (or forage for free) on branches to add each year.
What type of greenery do I use in my mantel garland?
Last year, I used mostly a feathery eucalyptus with some other pine tree type of branches. This year, I am using mostly cedar branches, with just a hint of eucalyptus for texture, because I am going for a slightly different look. I love both looks equally and they are achieved in the exact same way.

How do I add live greens to my mantel garland?
In order to add greenery to my mantel, I use branches that are relatively the same size and length as the garland branches. I just use regular house scissors to cut them down, but you could use pruning shears if you have them. The quantity and style of greenery is completely based on personal preference, so
I mostly just stick the branches in with the faux ones, and since the faux ones have wire in them, I can usually just finagle and twist them a little and get them to stay put pretty easily. If I have any that I can't get to stay on their own, I use floral wire to tie them into the garland. I will have to take all of the live branches out to discard them after the season, so I usually use the floral wire sparingly to save myself work later.
See what I mean about the live garland transforming the faux garland, making it look almost real?

Both of these garlands were achieved using the exact same technique and I love them both. They were so pretty in person! and they smell incredible.
Optional Step 7: Add Pinecones and Ribbons
As you can see from the top picture below, I am still fiddling with the ribbon, but I love adding the oversized pinecones and ribbon to my mantel. And of course, our stockings. I will most likely add my battery operated flickering candles in as well. They are a favorite and so magical! I am still working on it.
I will link here to the pinecones and candles here (just click on the picture or text link below):


Battery Operated, real wax, flickering, moving wick, timer pillar candles


Prolonging the life of your live garland greenery
I have very realistic expectations about the life of my garland because I live in a very dry climate. I know, just like my skin, the garland will dry out. And I am totally okay with it. Of course, I love it more when it is fresh and smells so good, but I think it is beautiful when it dries as well. If you want to prolong the life of any greenery, spritz it with water regularly and keep it in the coolest place possible.


Marsha
Love your ideas and how you’d use command strips to hang your garlands. I am trying this with my current garlands. How did you hang your pine cones? I usually put them on the mantle amongst the greenery but I like the look of them hanging.
Beth Patterson
Could you tell me where you got your faux garland so I can get it for next year? Thanks! I have been looking for the mirror for years. Can hardly wait to get one in January! Thanks for sharing your home with us! Merry Christmas!
Shaina
I might have missed it but I didn’t see a link to the look a like faux garland? Your mantel is beautiful!
Kristen Whitby
Here you go! https://www.ellaclaireinspired.com/christmas-garland/
AnneMarie
Thank you so much. I’m totally going to do this! I love the lush look of greenery.
Linda
So so pretty, I’m going to try this, this year.