How to Add Ribbon to a Christmas Tree
The ultimate step-by-step guide to decorating your Christmas tree with ribbon for a professional, high-end look.
Ingredients
- 1 Christmas Tree Your preference- flocked, green unflocked, tinsel, etc.
- 2 -5 spools ribbon (10-25 yards each)
Instructions
Prepare and Fluff the Christmas Tree (use this step for artificial tree)
-
Secure the base in the location you want and plug in the lights.
-
Add the first section, testing the plugs and lights as you go.“Fluff” section by making sure all of the branches are separated and not smashed.
-
Repeat until tree is completely assembled.
Add Large Ornaments and Decor
-
Start with any picks, berries, floral stems, branches.
-
Add tree topper, large ornaments and large tree decor.
-
Add ribbon (follow tutorial below)
-
Lastly, add smaller ornaments, anything super delicate, anything that clips to the branches, and tinsel if you choose
Cut the Ribbon Into Strips
-
Cut up that roll of ribbon into 3- 5 ft. manageable strips
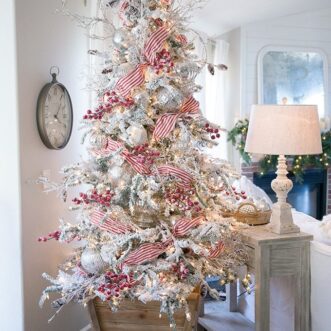
Wired Ribbon
-
Start at approximately eye level, or a little bit higher, and nestle one end of your ribbon into a natural opening between ornaments. You will not need to do anything extra to tie or secure your ribbon into the tree. It should stay in place. If it needs a little extra support, nestle it in between the smaller pieces of a branch.
-
Bounce the ribbon diagonally down and to the left (or right, depending on where you have other holes in the tree. I usually go to the left for my first piece)
-
Tuck in each point the meets the tree, creating a bouncing or jumping effect. Tip- let the ribbon naturally crinkle and wave for a more organic feel.
-
Repeat the bouncing and tucking 2 or 3 times until you reach the end of your first piece of ribbon.
-
Tuck in the end of your piece of ribbon the same way as you did the beginning.
-
Find another hole in the tree close to the middle of your first ribbon and that is where you will begin your second piece.
*Tip- for the most professional result, you will want to look at the tree as a whole, wrapping and bouncing the ribbon onto all sides that can be seen.
-
Repeat the above steps to create the bouncing effect, this time going down and in the opposite direction (to the right for me). The goal is to keep the eye moving throughout the tree, creating visual movement, softness, and interest.
*Tip- you can also apply all of the ribbons in the same (parallel) direction, or in sets of 2 (parallel, opposite, parallel). See below.
-
Repeat until your tree is finished. You can add as little or as much ribbon as you want. Just be sure to add it evenly spaced throughout the tree, filling in the natural holes.
Non-Wired Ribbon
-
For this technique, I tuck in my ribbon like I did for the wired version above except as I bounce it around the tree, I turn and flip the ribbon creating a curling look. It is very whimsical and pretty, with a ton of visual movement.
-
Bows. Once you have all of your ornaments on the Christmas tree, you can also cut lengths of ribbon to tie bows onto the branches. I generally tie bows and then wire them to the end of the branches so they are easier and look exactly how I want them to. You could also tie lengths directly to the tree itself.
Repeat with Coordinating Ribbon (optional)
-
Repeat steps above with a coordinating ribbon. I prefer to tuft and tuck them in the general area, or moving in the same direction, as I did my first ribbon.
Add Remaining Small Ornaments
-
Add remaining small and delicate ornaments.
-
Add tinsel, if desired. While the bigger ornaments are more set back into the tree, the smaller ornaments are layered on the outside.
Recipe Notes
Note- If you are more of a visual learner, see the video tutorial!
Note- Skip the first "Prepare and Fluff the Christmas Tree" steps if you are using a live tree.
Note- If you are using a very thin ribbon or tying ribbon into bows on the branches, you will add those at the very end, saving only the most delicate ornaments, if needed, for afterward.