Homemade French Bread
This easy and delicious homemade French bread recipe fills the house with the most wonderful aroma as it bakes and is the perfect side dish for dinner. It stays fresh for several days and also makes delicious sandwiches and French toast so it is sure to become one of your family's favorite recipes!
Ingredients
- 1/2 cup warm water
- 2 T active dry yeast
- 2 cups hot water
- 3 T sugar
- 1 T kosher salt (yes, Tablespoon)
- 5 T vegetable or canola oil
- 6 cups all purpose flour divided
- butter for glazing bread optional
Instructions
-
In a small bowl, add yeast to warm water and set aside, allowing to proof.
-
In the bowl of the mixer, using dough hooks, add hot water, sugar, oil, salt, and 3 cups of the flour and mix until well combined.
-
Gently pour the yeast water into the mixer while it is running, mixing until mostly incorporated. Keep mixer on and continue to gently add flour, 1 cup at a time. Continue to mix for 2 minutes until everything is well incorporated.
Note- the flour in any bread recipe can vary depending on many factors including altitude, weather, etc. You will want to gauge your flour measurement need based on the way your dough feels. The dough should clear the sides of the bowl, form a soft ball, and leave very little sticky dough residue on your finger when you touch it.
-
Let sit, covered with a cotton towel, for 10 minutes to allow rising. After 10 minutes, use a spoon (or turn on the mixer briefly) to punch down the dough, allowing it to fall. Repeat these steps for 1 hour total.
-
Split dough into 2 equal parts and set one aside.
-
On a onto a lightly floured surface, or a very lightly greased surface, with lightly greased hands, press one portion of dough into approximately a 9x12" rectangle.
-
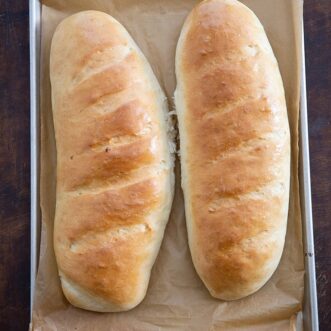
Roll dough up on the short side, so your bread is the length of the longer side. Pinch the ends so there is no visible roll and lay onto a parchment lined baking sheet.
Note: I usually put both loaves on one large baking sheet, but you may need 2 sheets if you do not have a large one.
-
Use a very sharp knife or a baker's lame to cut parallel slits in the dough.
-
Set in a warm area of your kitchen and allow to rise for 20-25 minutes or until the loaves have approximately doubled in size.
-
Preheat oven to 375 degrees while your loaves are rising.
-
Carefully place baking sheet into the oven without making the loaves fall. Bake for 20-25 minutes or until loaves are golden brown.
-
Remove from the oven and slather with melted butter.
Tip: Fold back the wrapper on one end of a stick of butter and rub on the hot loaves while holding the half of the stick that still has the wrapper on it. Cover remaining butter with the wrapper and store in the fridge until you make your next loaves.