

 A few months ago we participated in Calling it Home's One Room Challenge. Designers and bloggers were challenged to makeover one room in just six short weeks. We (or should I say I) decided our bedroom was the perfect room to tackle. We made a few small updates to our bedroom when we moved in to our home three years ago, but I was getting restless and ready for another change. And this challenge was exactly what we needed to kick start our bedroom makeover.
You can check out our progress week by week to see how we pulled it off.
I've always been drawn to farmhouse style. And let's face it, the farmhouse trend has become a bit of an obsession for many of us right now. I love that cozy, worn-in feeling and I wanted our bedroom to reflect that. I dreamt of a bedroom that conveyed that vintage farmhouse feel, with a little bit of romance thrown in. I knew I'd have to do a bit of convincing to get my husband on board, but he eventually agreed to help make my vision a reality.
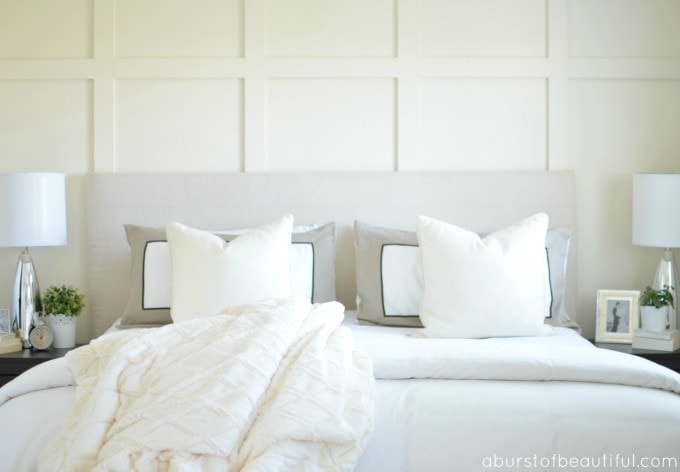
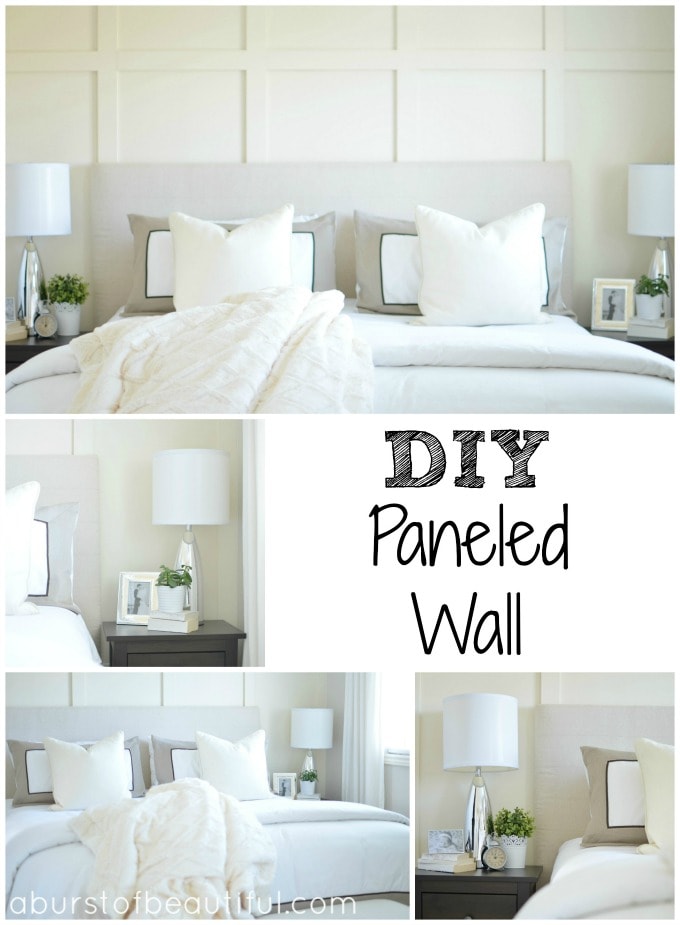
A big part of that vision was adding some much needed interest and character to our bedroom. It's a huge room and it lacked any type of architectural elements to help it feel cozy and welcoming. When we started I had three distinct ideas floating around my head. First, I thought about adding trim to the walls to create a picture rail. Secondly, I considered adding a plank wall behind our bed (I couldn't get shiplap out of my head after too many episodes of Fixer Upper). And lastly, I thought about building a paneled wall behind our bed and painting it a creamy white. I loved all of these ideas, but I finally decided on the paneled wall. I thought it was a timeless choice and I knew it would transition well with whatever future changes we made to our room.
 One of the updates we had made to our bedroom prior to this makeover was painting horizontal stripes on the wall behind our bed. I loved these stripes for a long time, so it was with a heavy heart that the Mr. covered over the stripes he had lovingly (and painstakingly) painted for me three years ago. I have to admit, I was a little sad to see those stripes go, but I'm so happy with the end result.

This is one of my favourite projects we've completed so far. It was relatively inexpensive (it cost us about $100 for supplies), and it adds such an impact. There are a few different ways you can create a panel wall, but we decided to go with five squares along the top with five large rectangles underneath each square. We considered creating the wall solely out of squares, but I thought it might look too busy. I like the simplicity that the rectangles add.
Supplies:
- Wood
- Nails
- Nail Gun
- Filler
- Caulking
- Paint
Instructions:
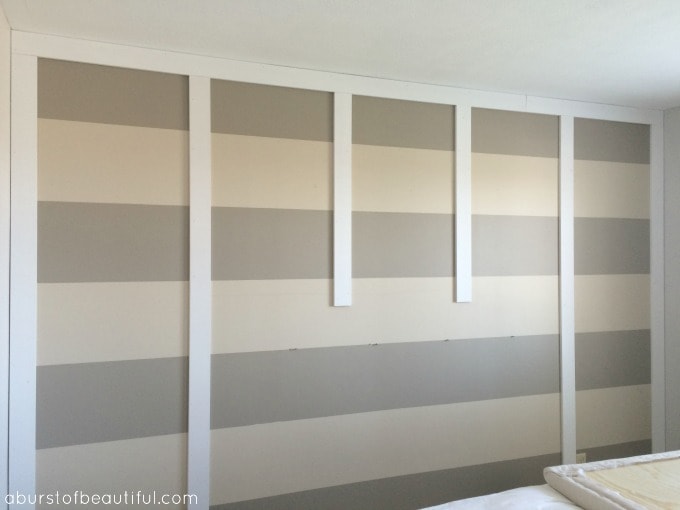 Next, take the number of vertical pieces of wood and multiply it by the width of the pieces you are using. We used 6 x 4" width pieces, so our total was 24".
Subtract the total width of the pieces from the overall length of the wall. For example, the length of our wall is 132" (132" - 24" = 108"). And then divide that number by the number of panels you are creating (108" / 5 = 21.6"). This will give you how many inches are needed between each piece of wood you add (vertically). Here's a handy little calculator we made for you to use as a guide - CALCULATOR
We made one square panel at the top of each rectangle panel to add a little extra depth. For this we just made it into a perfect square 21.6" x 21.6".
Once you have determined the placement of each panel, secure the pieces of wood on the wall with a nail gun. Fill the holes with filler and any spaces with caulking and allow to dry before sanding.
 Finally, give your new paneled wall a few coats of fresh paint and your project is complete!
 I hope you enjoyed our tutorial for this easy DIY Paneled Wall and I can't wait to share our next project with you!
We'd love for you join us on Instagram, Facebook and Twitter.
If you liked our DIY Paneled Wall, you might also enjoy these posts:
Gender Neutral Safari Nursery
 Kitchen Tour
DIY Tea Towel Art

Chelsea
This looks great! Do we need to nail our wood panel strips into studs? Also, what type of wood did you use? Thanks 🙂
Alicia Gavaris
Thank you Chelsea! We used pre-primed 1" x 4" MDF strips from The Home Depot. It is not necessary to nail them into the studs since the wood is fairly light and you won't be applying any weight to it. You can use some adhesive on the back of the boards if you'd like, however, if you ever decide to remove the wainscoting there will likely be some wall damage.
DIsa
Came out great and it's something I plan to try as well. I'm skittish about nailing the boards to the walls though. That's a LOT of holes, most of which would not be against a stud. Any other options one might use?
Alicia Gavaris
Thank you, we love how it turned out! If you use 1" x 4" MDF boards you should be fine. MDF is fairly light compared to hardwood trim. You can optionally add some construction adhesive to the back of the boards to make it more secure if you are not nailing into studs. We only used a nail gun to secure the boards and it's been one year and not one board has even showed signs of coming off of the wall. Good luck!
Tammy
Hi Stopping by to Thank you for sharing at Share It One More Time...you were one of the features this week!
Lou Lou Girls
I’m loving this! Pinned and tweeted! I always love your creations, thanks for sharing this with us at our party! I hope to see you tonight at 7 pm, we love seeing what you have been working on! Lou Lou Girls
Sarena @ Teal Inspiration
This is beautiful! Found you on the #HomeMattersParty and am in love with this wainscoting. 🙂
Gina
This is BEAUTIFUL! Love it! Thanks for sharing on the #ShareTheWealthSunday link up!
Bethany @ The Southern Couture
This is so gorgeous!!! I love that you can do it yourself. I have always loved wainscoting. I would really like to do this in my master bedroom. Thanks for sharing at Motivational Monday Link Party. I can't wait to see what you share tomorrow.
April R @Uncookie Cutter
This is amazing! What a fantastic idea! I have textured walls throughout, I 'm wondering how this technique would work on them Hmmm....lovely!!
Alicia Gavaris
Thank you April! You should be able to add this wainscoting to textured walls. The only issue you may run into is the panels will not lay flat against the wall (depending on the type of texture), but if that doesn't bother you it will work just fine.
Gail Akeman
Thank you for joining the Small victories Sunday linkup. Please join again. Pinned to the group board.
Beverly
This is lovely! You did a wonderful job transforming the look of the space. Great instructions, too! Thanks for sharing on Snickerdoodle Sunday.
Pamela Smith
I love this idea! I am pinning this so I will rememer when the time comes for a bedroom redo! Thanks!
Alicia Gavaris
Great! I'm so glad you liked it!
Heather C
Really great job, I had forgotten it was you I copied and painted horizontal stripes, which I still love. But who knows somewhere down the line I may put in a paneled wall.
Alicia Gavaris
Thank you Heather! We loved our stripes for a long long time. They are such a fun way to add some character to a room.
Lisa Mothersead
That wall looks amazing! I think you just added value to your home, also! Love it.
Alicia Gavaris
Thank you Lisa! I can't get over how much of an impact it makes in the room. I'm so glad we made this change!
Shawnna
The room looks really good!! Great job!!
Alicia Gavaris
Thank you so much Shawna! I'm glad you like it.